• Contact
  • About Me
  • Privacy Policy
DefenceDev
  • Home
  • Blog
  • Linux Tutorials
    • Bash Scripting Lessons
    • Commands
    • Networking
  • Solutions
    • Docker
  • Network Tutorials
    • FortiGate
    • MikroTik
  • Projects
    • AdGuard
    • Immich
    • Nextcloud
    • WordPress
  • Cloud
  • Video Tutorials
    • YouTube Channel
    • MikroTik Videos
No Result
View All Result
DefenceDev
No Result
View All Result
ADVERTISEMENT
Home Cloud Private

VMware ESXi: Configure VLAN and Attach to VM

neo by neo
May 27, 2025
in Private
0
VMware ESXi: Configure VLAN and Attach to VM

VMware ESXi: Configure VLAN and Attach to VM

0
SHARES
24
VIEWS
Share on FacebookShare on Twitter
ADVERTISEMENT

VMware ESXi: Configure VLAN and Attach to VM

Introduction

Configuring VLANs (Virtual Local Area Networks) on VMware ESXi is a critical step for network segmentation, improved security, and efficient traffic management in virtualized environments. VLANs allow administrators to isolate different types of network traffic within the same physical network, which is especially useful in virtualized infrastructures where multiple VMs share the same host.

ESXi VLAN Configuration

To set up VLANs on ESXi, start by accessing the ESXi Web Client or vSphere Client. Navigate to the networking section and select the virtual switch (vSwitch) you wish to configure. Each VLAN will need a unique identifier (VLAN ID), typically a number between 1 and 4094. Assign this VLAN ID to the port group associated with the virtual machines you want to segment.

In this case, we will create VLAN 300:
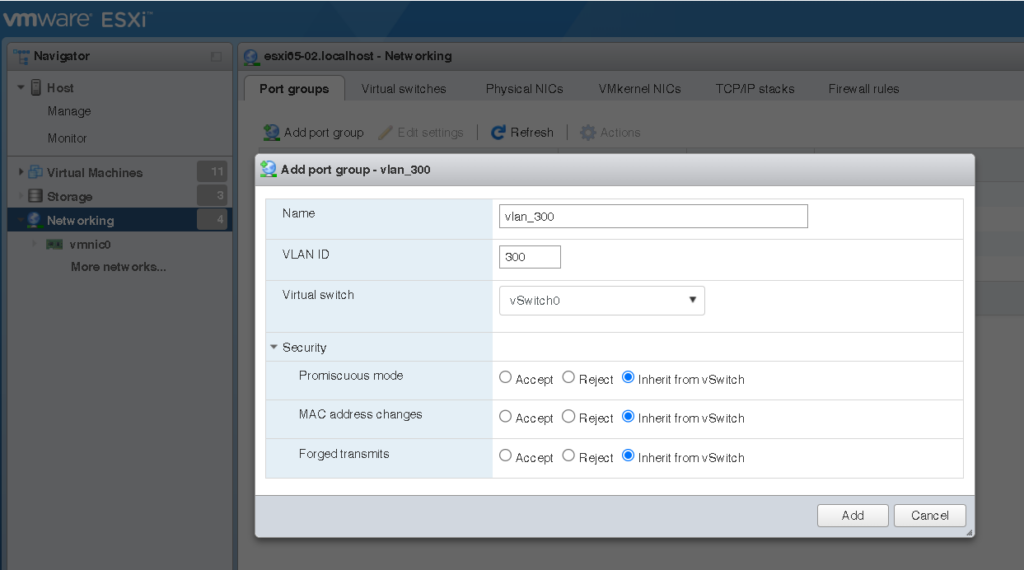
VMware ESXi VLAN, Add new VLAN

VLAN Settings:

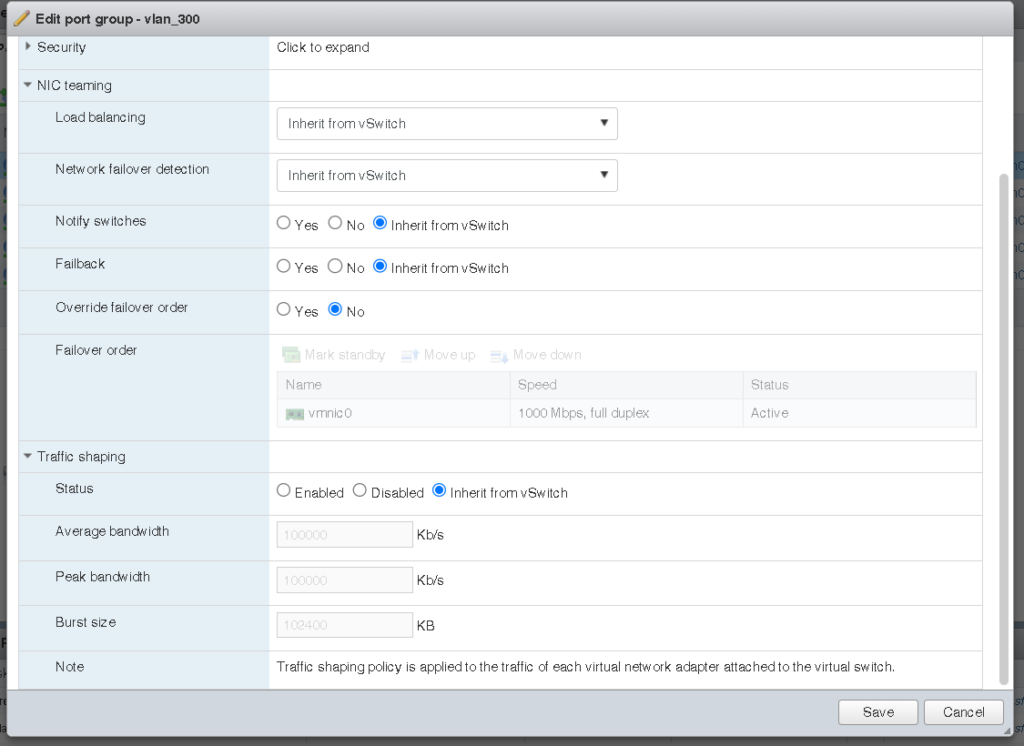
VMware ESXi VLAN, Other VLAN Settings

When configuring VLANs, it’s essential to ensure that the physical switch ports connecting to the ESXi host are set to “trunk” mode to pass tagged VLAN traffic. You can also define multiple VLANs on a single vSwitch, making it easier to manage complex networks with reduced hardware.
ADVERTISEMENT
ADVERTISEMENT
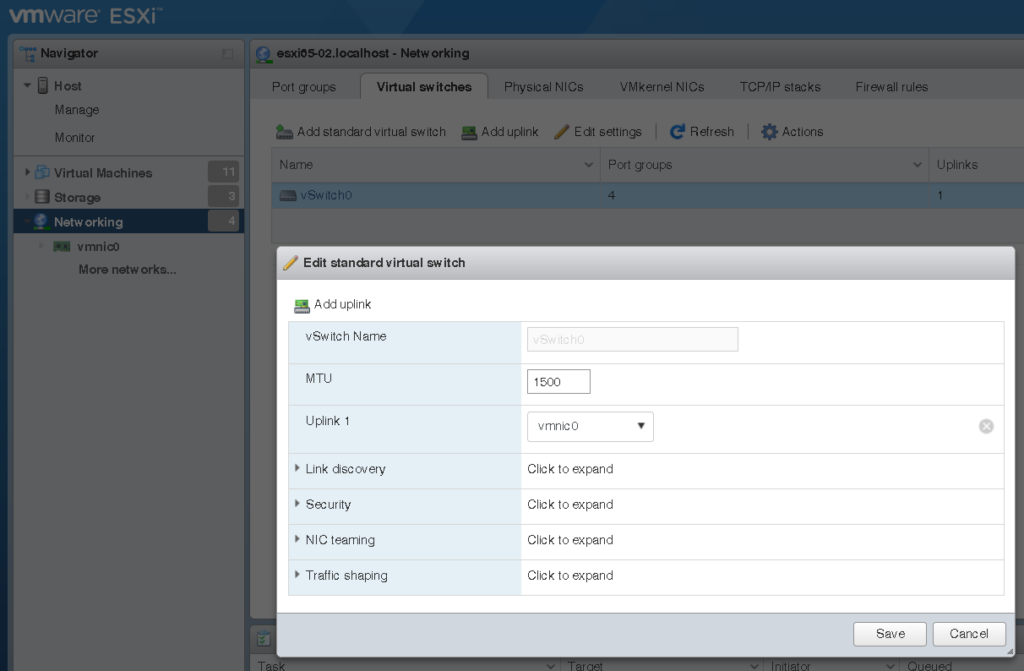
VMware ESXi Virtual Switch

Troubleshooting VLANs on ESXi may involve checking the vSwitch and port group settings and confirming that the physical switch is appropriately configured to pass VLAN-tagged packets. By following these steps, you can achieve efficient VLAN management, enhance security, and control traffic flow within your virtual infrastructure.

Configuring VLANs on ESXi enhances flexibility and can significantly reduce network complexity while ensuring robust isolation of sensitive traffic. Proper VLAN setup ensures optimized network performance and security across all virtual machines in the VMware ESXi environment.

Assign VLAN to Virtual Machine (VM)

  • Step 1: Right click on VM
  • Step 2: Click on Edit settings
Edit Settings to assign VLAN
  • Under Network Adapter assign created VLAN (in my case vlan_300)
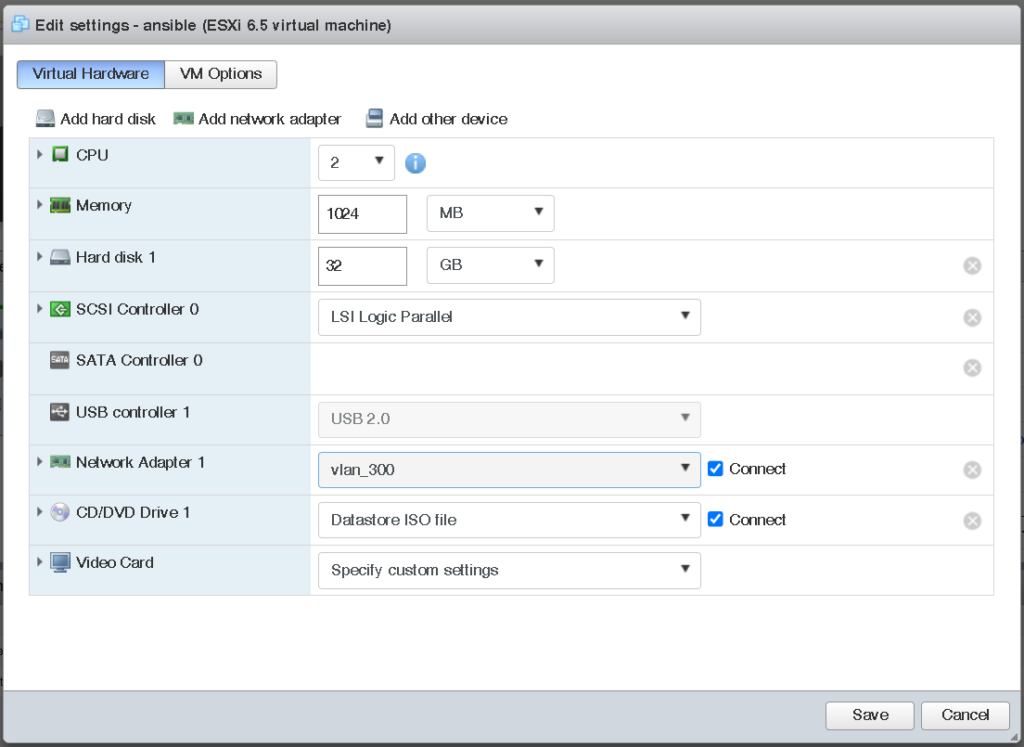
VM Settings, Change Network Adapter to created VLAN

VMware ESXi: Configure VLAN and Attach to VM

CyberWorld

About The Author

neo

See author's posts

ADVERTISEMENT
Tags: vmware-esxi
ADVERTISEMENT
Previous Post

Fortinet FortiGate: Check the Routing Table in the CLI

Next Post

Fortinet FortiGate: Packet Capture from CLI and GUI

neo

neo

Next Post
FortiGate Packet Capture from 'Network' and 'Packet Capture' sub menu.

Fortinet FortiGate: Packet Capture from CLI and GUI

Follow Us

  • Trending
  • Comments
  • Latest
MikroTik: Export Configuration in Text File

MikroTik: Export Configuration in Text File

Fortinet FortiGate: Static Route Configuration via GUI and CLI

Fortinet FortiGate: Static Route Configuration via GUI and CLI

Immich: Installation on Ubuntu 22.04

Immich: Installation on Ubuntu 22.04

Fortinet FortiGate Upgrade Path Tool

Fortinet FortiGate Upgrade Path Tool

NextCloud: Port Forwarding - Essential Ports for Smooth Functionality

NextCloud: Port Forwarding – Essential Ports for Smooth Functionality and Remote Access

Organizing and Managing Photos with Immich: Features I Use

Organizing and Managing Photos with Immich: Features I Use

Install Ubuntu 22.04 on Oracle VM Virtual Box

Install Ubuntu 22.04 on Oracle VM Virtual Box

Linux Directories: cd (Change Directory), pwd (Print Working Directory), mkdir (Make Directory)

Linux Directories: cd (Change Directory), pwd (Print Working Directory), mkdir (Make Directory)

Install WordPress on Raspberry Pi 4 with Docker (Ubuntu 22.04)

Install WordPress on Raspberry Pi 4 with Docker (Ubuntu 22.04)

Install Nextcloud on Raspberry Pi 4 with Docker (Ubuntu 22.04)

Install Nextcloud on Raspberry Pi 4 with Docker (Ubuntu 22.04)

Install Nginx Proxy Manager on Raspberry Pi 4 with Docker (Ubuntu 22.04)

Install Nginx Proxy Manager on Raspberry Pi 4 with Docker (Ubuntu 22.04)

Install Docker on Raspberry Pi 4 with Ubuntu 22.04

Install Docker on Raspberry Pi 4 with Ubuntu 22.04

Recent News

Install WordPress on Raspberry Pi 4 with Docker (Ubuntu 22.04)

Install WordPress on Raspberry Pi 4 with Docker (Ubuntu 22.04)

Install Nextcloud on Raspberry Pi 4 with Docker (Ubuntu 22.04)

Install Nextcloud on Raspberry Pi 4 with Docker (Ubuntu 22.04)

Install Nginx Proxy Manager on Raspberry Pi 4 with Docker (Ubuntu 22.04)

Install Nginx Proxy Manager on Raspberry Pi 4 with Docker (Ubuntu 22.04)

Install Docker on Raspberry Pi 4 with Ubuntu 22.04

Install Docker on Raspberry Pi 4 with Ubuntu 22.04

MikroTik: Check Your Wireless Password

MikroTik: Check Your Wireless Password

ADVERTISEMENT

DefenceDev Tutorials

defencedev Logo

Whether you’re just starting or looking to expand your skills, I hope you find useful information and engaging discussions here. Let me take you through my journey and the goals behind this space!

Follow Us

Browse by Category

  • Blog
  • Cloud
    • Private
  • Linux Tutorials
    • Bash Scripting Tutorials
    • Commands
    • Networking
  • Network Tutorials
    • FortiGate
    • MikroTik
  • Projects
    • AdGuard
    • Immich
    • Nextcloud
    • WordPress
  • Solutions
    • Docker
  • Video Tutorials
    • MikroTik Videos

Recent News

Install WordPress on Raspberry Pi 4 with Docker (Ubuntu 22.04)

Install WordPress on Raspberry Pi 4 with Docker (Ubuntu 22.04)

Install Nextcloud on Raspberry Pi 4 with Docker (Ubuntu 22.04)

Install Nextcloud on Raspberry Pi 4 with Docker (Ubuntu 22.04)

  • Site Map
  • Privacy Policy
  • Facebook Page
  • Disclaimer
  • Contact
  • About Me

© 2025 defencedev.com - All rights reserved.

No Result
View All Result
  • Home
  • Blog
  • Linux Tutorials
    • Bash Scripting Lessons
    • Commands
    • Networking
  • Solutions
    • Docker
  • Network Tutorials
    • FortiGate
    • MikroTik
  • Projects
    • AdGuard
    • Immich
    • Nextcloud
    • WordPress
  • Cloud
  • Video Tutorials
    • YouTube Channel
    • MikroTik Videos

© 2025 defencedev.com - All rights reserved.