• Contact
  • About Me
  • Privacy Policy
DefenceDev
  • Home
  • Blog
  • Linux Tutorials
    • Bash Scripting Lessons
    • Commands
    • Networking
  • Solutions
    • Docker
  • Network Tutorials
    • FortiGate
    • MikroTik
  • Projects
    • AdGuard
    • Immich
    • Nextcloud
    • WordPress
  • Cloud
  • Video Tutorials
    • YouTube Channel
    • MikroTik Videos
No Result
View All Result
DefenceDev
No Result
View All Result
ADVERTISEMENT
Home Network Tutorials FortiGate

Fortinet FortiGate: Port Forwarding for HTTPS NAT Configuration

neo by neo
May 27, 2025
in FortiGate
0
Fortinet FortiGate: Change Default Administration HTTPS and HTTP Port

Fortinet FortiGate: Change Default Administration HTTPS and HTTP Port

0
SHARES
105
VIEWS
Share on FacebookShare on Twitter
ADVERTISEMENT

Port Forwarding NAT (Network address translation) Configuration

Port forwarding, also known as port mapping, is a technique used to redirect communication requests from one address and port number combination to another while packets traverse a network gateway, such as a router or firewall. It is commonly used to allow remote computers to access specific applications hosted on a private network.

What is Port Forwarding?

Port forwarding is a crucial feature in network security, allowing external devices to access services on a private network through a firewall. Fortinet’s FortiGate firewall provides robust port forwarding capabilities that are essential for businesses to manage traffic effectively and securely. This guide will walk you through the steps to configure port forwarding on a FortiGate firewall.

Why Use Port Forwarding (NAT) on FortiGate?

  • Remote Access: Enable remote users to connect to services such as web servers, FTP servers, or other applications on the internal network.
  • Security: FortiGate offers advanced security features that help protect internal services from unauthorized access while allowing legitimate traffic.
  • Network Optimization: Efficiently manage and optimize traffic flow between the internet and internal network resources.

Port Forwarding Diagram
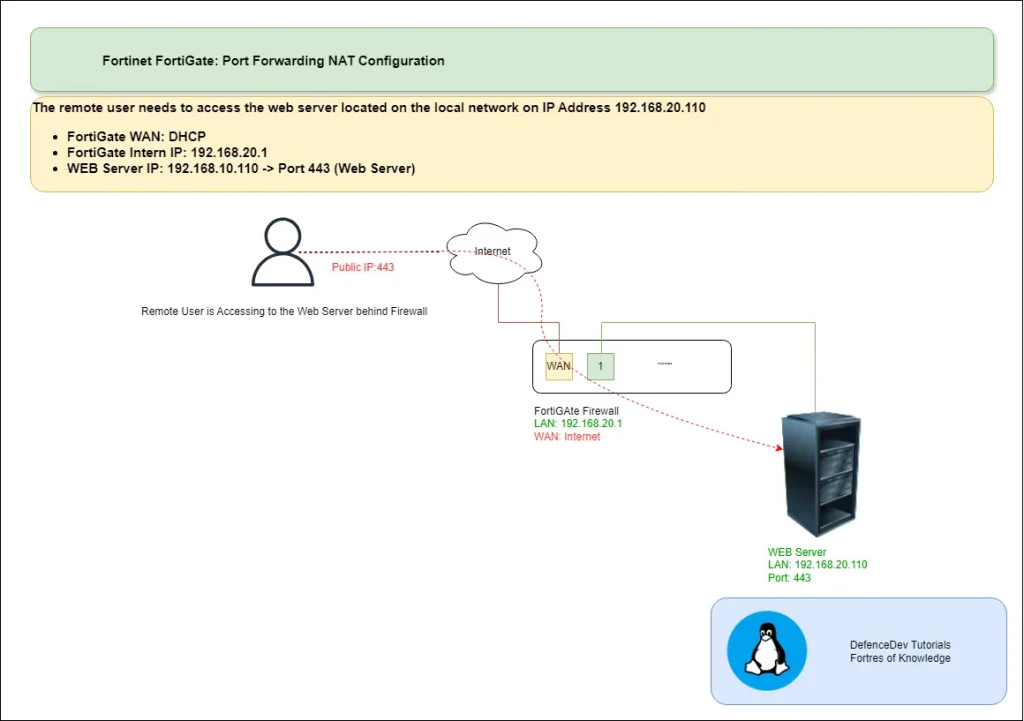
FortiGate Port Forwarding NAT Configuration Diagram
  • FortiGate WAN: DHCP
  • FortiGate Intern IP: 192.168.20.1
  • WEB Server IP: 192.168.10.110 -> Port 443 (Web Server)

Prerequisites

Before configuring port forwarding on your FortiGate firewall, ensure that:

  • You have administrative access to the FortiGate management interface.
  • You know the internal IP address and port number of the device or service you want to forward traffic to.
  • You have the external IP address (usually the WAN IP) where the traffic will be forwarded.

ADVERTISEMENT

Configuring Port Forwarding on FortiGate

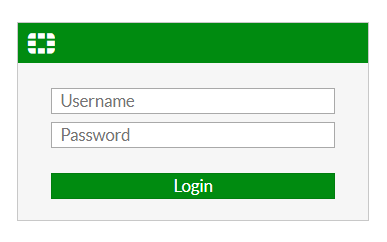
Step 1: Access to the Fortinet FortiGate Device

  • Open a web browser and enter the FortiGate management IP address.
  • Log in using your administrative credentials.
FortiGate Login Page

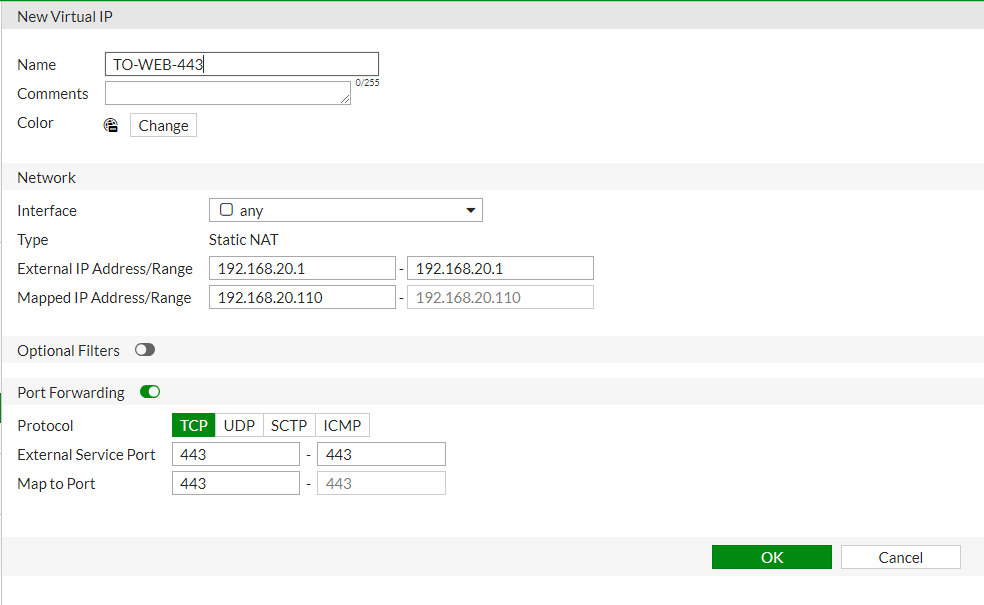
Step 2: Create a Virtual IP (VIP)

  • Navigate to Policy & Objects > Virtual IPs.
  • Click Create New and select Virtual IP.
Policy & Objects -> Virtual IPs

Configure the following settings:

  • Name: Enter a descriptive name for the VIP.
  • Interface: Select the external interface (e.g., wan1).
  • External IP Address/Range: Enter the public IP address or range that will be used for the port forwarding.
  • Mapped IP Address/Range: Enter the internal IP address of the server or device.
  • Port Forwarding: Enable this option.
  • External Service Port: Enter the external port number (e.g., 443 for HTTPS).
  • Map to Port: Enter the internal port number (e.g., 443 for HTTPS).

Click OK to save the VIP.

Virtual IP Configuration

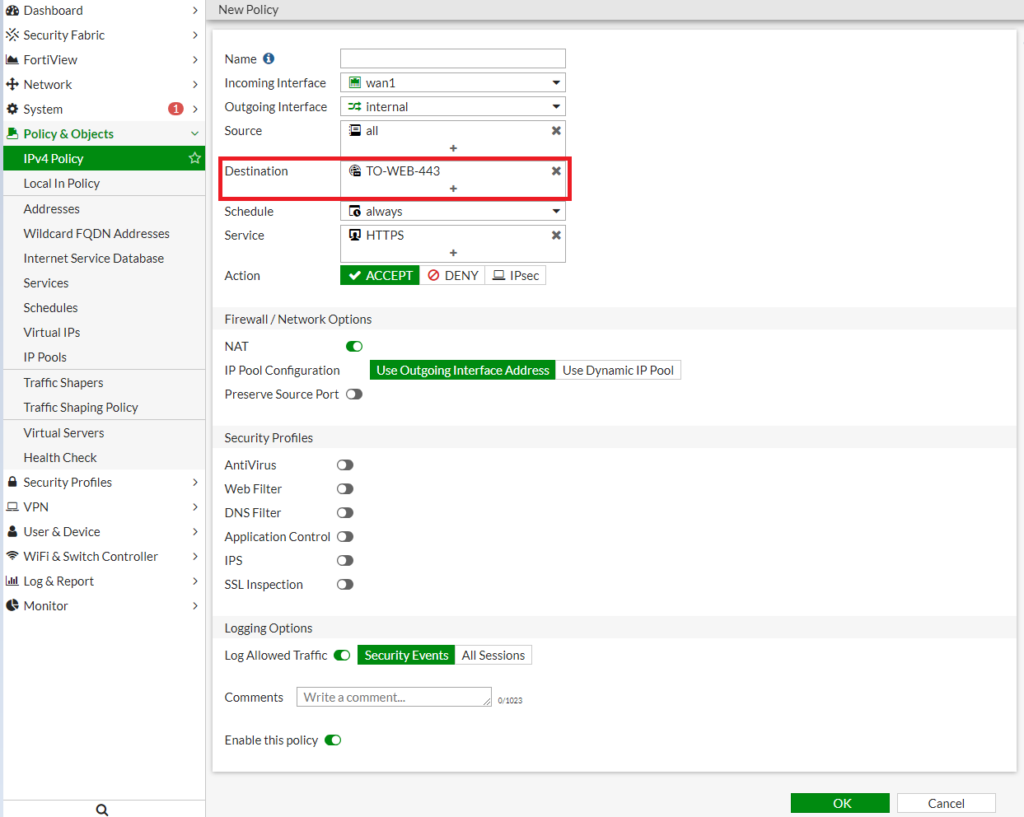
Step 3: Create a Firewall Policy

  1. Navigate to Policy & Objects > IPv4 Policy.
  2. Click Create New to add a new policy.
  3. Configure the following settings:
    • Name: Enter a descriptive name for the policy.
    • Incoming Interface: Select the external interface (e.g., wan1).
    • Outgoing Interface: Select the internal interface (e.g., internal).
    • Source: Set to All or specify specific source addresses.
    • Destination: Select the VIP created in Step 2.
    • Service: Choose the appropriate service (e.g., HTTPS).
    • Action: Set to Accept.
  4. Enable NAT if required.
  5. Click OK to save the policy.
Create IPv4 Policy
Create IPv4 Policy

defencedev.com

ADVERTISEMENT

ADVERTISEMENT

About The Author

neo

See author's posts

Tags: fortigate
ADVERTISEMENT
Previous Post

Automating Linux Server Health Checks with a Bash Script

Next Post

Fortinet FortiGate: Static Route Configuration via GUI and CLI

neo

neo

Next Post
Fortinet FortiGate: Static Route Configuration via GUI and CLI

Fortinet FortiGate: Static Route Configuration via GUI and CLI

Follow Us

  • Trending
  • Comments
  • Latest
MikroTik: Export Configuration in Text File

MikroTik: Export Configuration in Text File

Fortinet FortiGate: Static Route Configuration via GUI and CLI

Fortinet FortiGate: Static Route Configuration via GUI and CLI

Immich: Installation on Ubuntu 22.04

Immich: Installation on Ubuntu 22.04

Fortinet FortiGate Upgrade Path Tool

Fortinet FortiGate Upgrade Path Tool

NextCloud: Port Forwarding - Essential Ports for Smooth Functionality

NextCloud: Port Forwarding – Essential Ports for Smooth Functionality and Remote Access

Organizing and Managing Photos with Immich: Features I Use

Organizing and Managing Photos with Immich: Features I Use

Install Ubuntu 22.04 on Oracle VM Virtual Box

Install Ubuntu 22.04 on Oracle VM Virtual Box

Linux Directories: cd (Change Directory), pwd (Print Working Directory), mkdir (Make Directory)

Linux Directories: cd (Change Directory), pwd (Print Working Directory), mkdir (Make Directory)

Install WordPress on Raspberry Pi 4 with Docker (Ubuntu 22.04)

Install WordPress on Raspberry Pi 4 with Docker (Ubuntu 22.04)

Install Nextcloud on Raspberry Pi 4 with Docker (Ubuntu 22.04)

Install Nextcloud on Raspberry Pi 4 with Docker (Ubuntu 22.04)

Install Nginx Proxy Manager on Raspberry Pi 4 with Docker (Ubuntu 22.04)

Install Nginx Proxy Manager on Raspberry Pi 4 with Docker (Ubuntu 22.04)

Install Docker on Raspberry Pi 4 with Ubuntu 22.04

Install Docker on Raspberry Pi 4 with Ubuntu 22.04

Recent News

Install WordPress on Raspberry Pi 4 with Docker (Ubuntu 22.04)

Install WordPress on Raspberry Pi 4 with Docker (Ubuntu 22.04)

Install Nextcloud on Raspberry Pi 4 with Docker (Ubuntu 22.04)

Install Nextcloud on Raspberry Pi 4 with Docker (Ubuntu 22.04)

Install Nginx Proxy Manager on Raspberry Pi 4 with Docker (Ubuntu 22.04)

Install Nginx Proxy Manager on Raspberry Pi 4 with Docker (Ubuntu 22.04)

Install Docker on Raspberry Pi 4 with Ubuntu 22.04

Install Docker on Raspberry Pi 4 with Ubuntu 22.04

MikroTik: Check Your Wireless Password

MikroTik: Check Your Wireless Password

ADVERTISEMENT

DefenceDev Tutorials

defencedev Logo

Whether you’re just starting or looking to expand your skills, I hope you find useful information and engaging discussions here. Let me take you through my journey and the goals behind this space!

Follow Us

Browse by Category

  • Blog
  • Cloud
    • Private
  • Linux Tutorials
    • Bash Scripting Tutorials
    • Commands
    • Networking
  • Network Tutorials
    • FortiGate
    • MikroTik
  • Projects
    • AdGuard
    • Immich
    • Nextcloud
    • WordPress
  • Solutions
    • Docker
  • Video Tutorials
    • MikroTik Videos

Recent News

Install WordPress on Raspberry Pi 4 with Docker (Ubuntu 22.04)

Install WordPress on Raspberry Pi 4 with Docker (Ubuntu 22.04)

Install Nextcloud on Raspberry Pi 4 with Docker (Ubuntu 22.04)

Install Nextcloud on Raspberry Pi 4 with Docker (Ubuntu 22.04)

  • Site Map
  • Privacy Policy
  • Facebook Page
  • Disclaimer
  • Contact
  • About Me

© 2025 defencedev.com - All rights reserved.

No Result
View All Result
  • Home
  • Blog
  • Linux Tutorials
    • Bash Scripting Lessons
    • Commands
    • Networking
  • Solutions
    • Docker
  • Network Tutorials
    • FortiGate
    • MikroTik
  • Projects
    • AdGuard
    • Immich
    • Nextcloud
    • WordPress
  • Cloud
  • Video Tutorials
    • YouTube Channel
    • MikroTik Videos

© 2025 defencedev.com - All rights reserved.