Antivirus Basics
FortiGate antivirus engine provides robust protection against malware, viruses, and other malicious threats. Integrated into the FortiOS security fabric, this feature actively scans network traffic in real-time to detect and prevent infections. Meanwhile, the antivirus engine leverages Fortinet’s FortiGuard Labs threat intelligence, which continuously updates signature databases to stay ahead of emerging threats.
In essence, the antivirus system relies on a database of virus signatures to quickly identify and block malicious code. To detect a virus, the antivirus software must match file with pattern <signature>. Antiviurs applications are using different detection engines and signatures. Some of them are:
- CRC
- MD5
- Encryption keys
- Combinations of file attributes
- Pars of code
- Binary values in some areas
Antivirus Scanning Techniques and Order
- Antivirus Scan
- Detects and eliminates malware in real time base on the match in database signature
- Multiple FortiGuard antivirus database exist and can be configured in CLI using config antivirus seting (support depends on FortiGate model)
- Type of database:
- Normal -> Contains signatures for viruses that have been detectred in recent months
- Extended -> Detects ciruses that are no longer active and many common platforms are still vulnerable to these viruses
- Extreme -> To be used in high-security environments.
- Type of database:
- Grayware scan
- This technic detects viruses installed withous the user knowledge or consent.
- Uses grayware signatures
- Detects and blocks unsolicited programs
- Antivirus Actions apply
- This technic detects viruses installed withous the user knowledge or consent.
- Herustics scan (Optional: must be enabled in CLI)
- These scans are based on probablity and they detect zero-day viruses
- Looks for virus-like code
- Counts virus-like attributes and if greated than a threshold, file is suspicious
- False positives possible
- To enable it type
config antivirus heuristic pass/block/disable
- These scans are based on probablity and they detect zero-day viruses
Key Features of FortiGate Antivirus
- Signature-based detection to identify known threats.
- Heuristic scanning to detect suspicious file behavior.
- Inline scanning to prevent infected files from reaching endpoints.
- Cloud-based threat intelligence for real-time updates.
- Sandboxing capabilities (if licensed) for advanced threat analysis.
Antivirus Scanning Modes
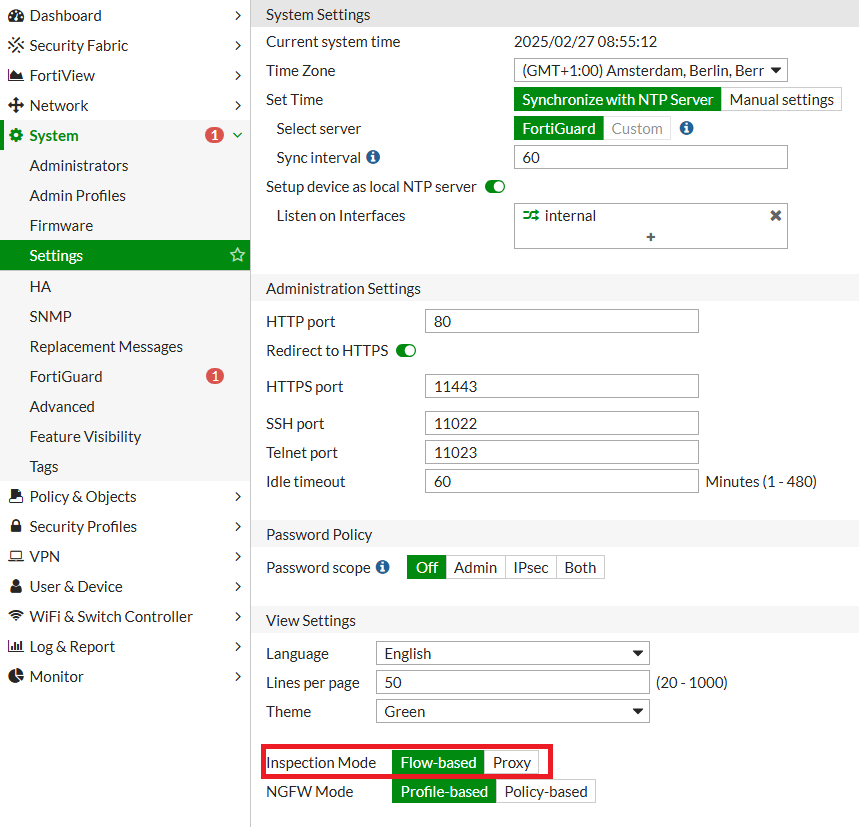
FortiGate provides different scanning modes to balance security and performance based on network requirements. You can configure FortiGate’s inspection mode by navigating to System -> Settings in the GUI.
1. Flow-Based Scanning
When antivirus profile is operating in flow-based inspection mode there are two scanning mode options available:
- Full scan mode
- Quick scam mode
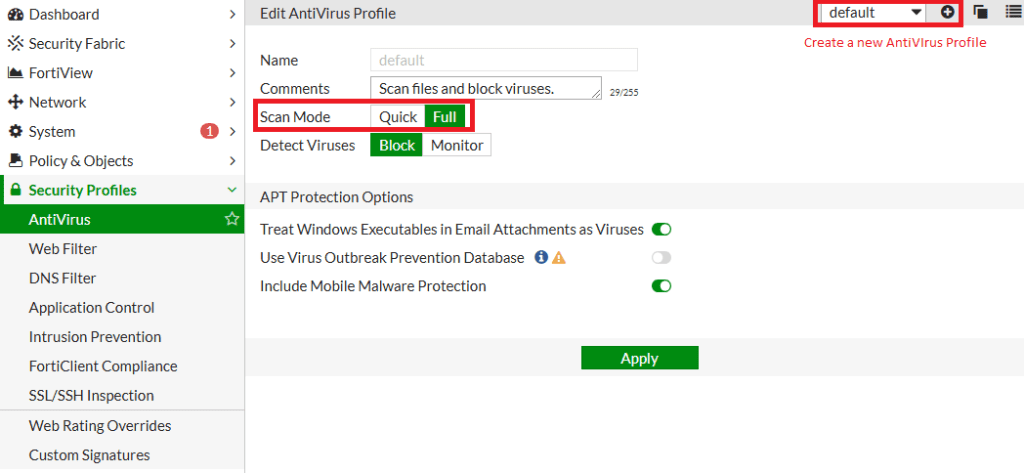
If the scan detects a virus in a TCP session after forwarding some packets to the client, FortiGate resets the connection without inserting a block replacement page. This makes the client think it encountered a network error. However, the FortiGate IPS engine caches the URL, so on the next download attempt, it immediately displays the block replacement page.
Flow-Based scanning overview:
- Faster than proxy-based scanning.
- Uses IPS engine to detect malware based on signatures.
- Can detect threats in real-time with minimal impact on network speed.
- Ideal for high-performance networks where speed is a priority.
2. Proxy-Based Scanning
Proxy-based scanning uses the full antivirus database, requiring the client to wait until the scan completes before receiving the file. FortiGate first buffers the entire file (or waits until the oversize limit is reached) before starting the scan.
In case that you are using Proxy inspection mode you can select different protocols for inspection like HTTP, SMTP. POP§, IMAP, MAPI and FTP. You need to enable SSL/SSH deep-inspection to scan encrypted traffic.
Proxy-Based scanning overview:
- Provides deeper inspection of files.
- Supports additional content analysis features, such as decompression and DLP (Data Loss Prevention).
- May introduce slight latency due to deeper scanning.
- Best for environments where security is more critical than speed.
3. Sandboxing (FortiSandbox Integration)
Sandboxing overview:
- Suspicious files are sent to an isolated environment for behavior analysis.
- Provides an additional layer of protection for zero-day threats.
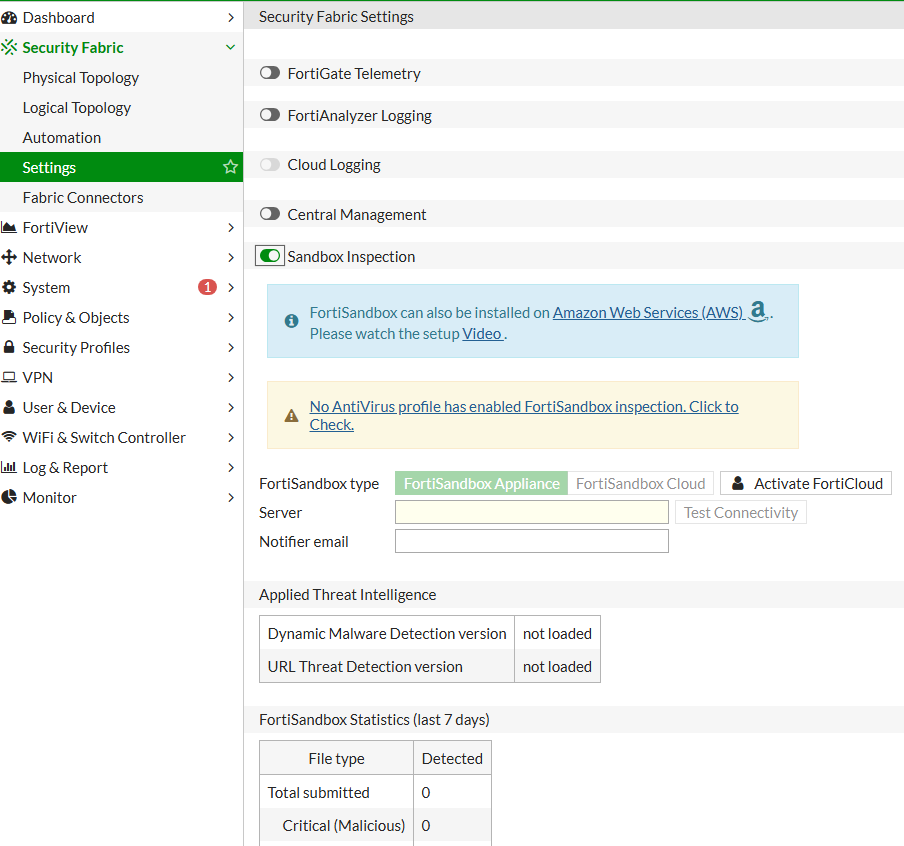
- Requires a FortiSandbox license and configuration (Security Fabric -> Settings)
- You can control which files will be sent to FortiSandox under Security Profile -> Antivirus
Antivirus Configuration
To configure the antivirus feature on FortiGate, follow these steps:
1. Enable Antivirus in Security Profiles
- Navigate to Security Profiles > Antivirus.
- Enable Antivirus Scanning and select the desired scanning mode (Flow-based or Proxy-based).
- Customize options such as blocking infected files or logging detections.

2. Apply Antivirus Profile to a Firewall Policy
- Go to Policy & Objects > Firewall Policy.
- Select the policy where antivirus protection is needed.
- Under Security Profiles, enable Antivirus and select the configured profile.
- Save and apply changes.
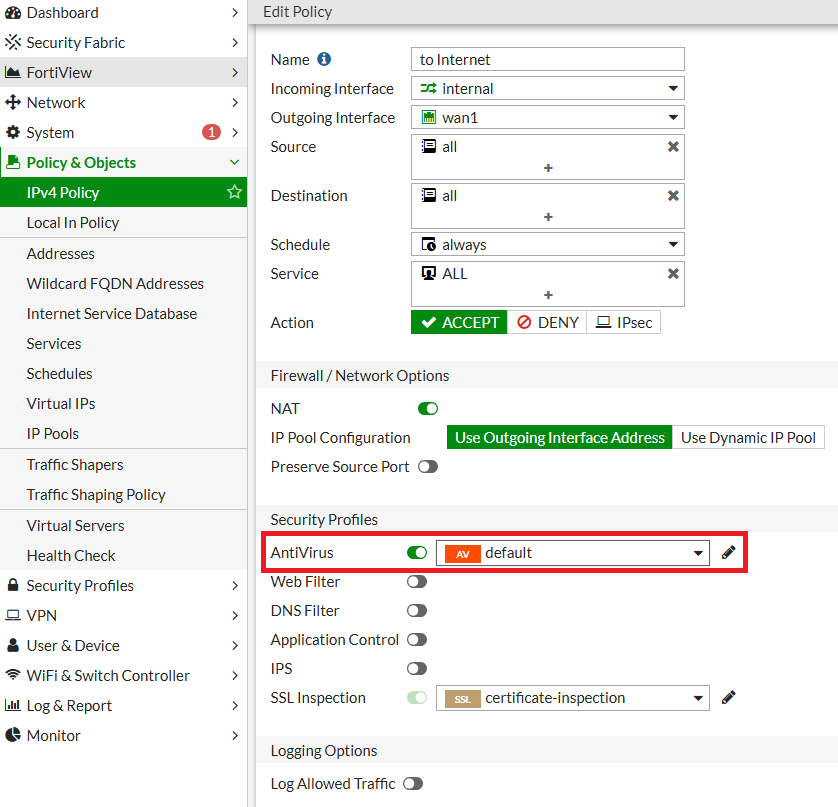
Under SSL Inspection, select deep-inspection instead of certificate-based inspection to fully inspect content.
Explore more FortiGate policy configuration topics—click the link to deepen your knowledge!
3. Configuring FortiSandbox (Optional and if you have a Subscription)
- If FortiSandbox is used, enable the sandbox option within the antivirus profile.
- Specify which file types should be sent for analysis.
FortiGate Antivirus Best Practices
To maximize FortiGate antivirus efficiency, follow these best practices:
1. Keep Signature Databases Updated
- Ensure FortiGate is connected to FortiGuard to receive the latest virus definitions.
- Configure automatic updates to prevent outdated protection.
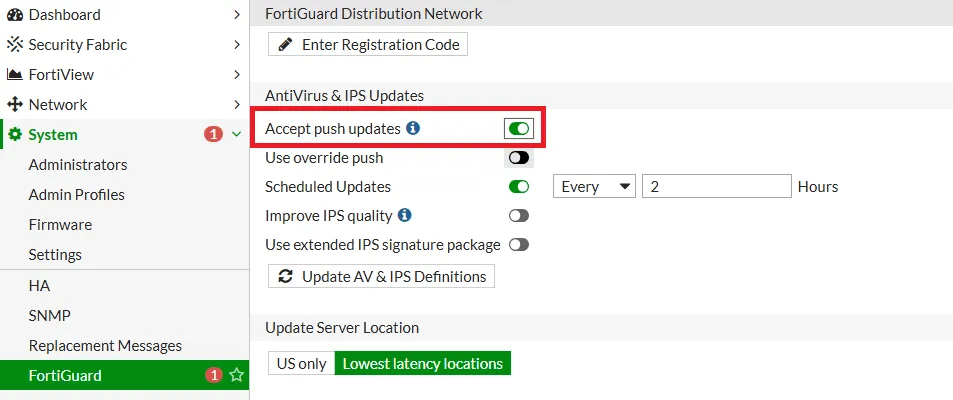
- Enable
FortiGuardPush updates to ensure FortiGate receives antivirus updates as soons as the are available. You can configure this underSystem->FortiGuard
2. Use a Balanced Scanning Mode
- If performance is a concern, use flow-based scanning.
- For stricter security requirements, opt for proxy-based scanning.
3. Enable Logging and Reporting
- Monitor antivirus logs to identify and respond to threats.
- Use FortiAnalyzer for in-depth analysis and reporting.
4. Leverage Sandboxing for Advanced Threat Protection
- Configure FortiSandbox to analyze unknown or suspicious files.
- Ensure proper licensing is in place for sandbox functionality.
5. Restrict File Types
- Block unnecessary file types from entering the network (e.g., executables from untrusted sources).
Troubleshooting
If the antivirus functionality is not working as expected, follow these steps:
1. Check Antivirus Logs
- Go to
Log & Report>Antivirus Logto check blocked threats. - Use
FortiViewto monitor threats to your network
2. Verify Antivirus Database Updates
On this link you can check the latest antivirus database version.
- Run the command:
diagnose autoupdate versionsdiagnose autoupdate status- Ensure that the FortiGuard AV signatures are up to date.
execute update-avYou can check status of FortiGuard antivirus License under System -> FortiGuard.
3. Confirm Policy Configuration
- Ensure the antivirus profile is applied to the correct firewall policies.
- Run the following command:
diagnose firewall policy list- Check that the antivirus security profile is enabled.
4. Test with EICAR Test File
- Download the EICAR test file from a safe source to confirm that the antivirus engine is actively detecting threats.
5. Use Debugging Commands
Some useful antivirus commands are:
- Display virus statistics afor the last one minute:
get system performance status- Display current antivirus database information:
diagnose antivirus database-info- Displays current antivirus engine and signature versions:
diagnose autoupdate versions- Display scan times for infected files:
diagnose antivirus test "get scantime"- Forces FortiGate to check for antivirus updates from FortiGuard server:
execute update-av- Analyze the output for errors or misconfigurations.
6. Hardware Acceleration for Antivirus Scanning
This settings will accelerate the flow-based antivirus only.
config ips global
 set np-accel-mode {none | basic}
end
If you configurebasic it will enable NTurbo acceleration.


