
DDoS Protection with Fortinet FortiGate Firewall
Distributed Denial of Service (DDoS) attacks are among the most common and disruptive forms of cyber threats today. Their goal is to overwhelm a server or application with excessive traffic, rendering it slow or completely unavailable to legitimate users.
One common method is a SYN flood attack, where the attacker sends a large volume of incomplete TCP connection requests (SYN packets) to exhaust server resources and prevent new connections. Other variations include UDP floods, ICMP floods, or application-level attacks targeting HTTP or DNS.
Applications that are public-facing and self-hosted — such as web servers, email servers, VPN gateways, or VoIP systems — are especially vulnerable. Without proper mitigation, these services can be brought down quickly by even relatively small-scale attacks.
Fortinet FortiGate firewalls provide a powerful defense mechanism through their DoS Policy and Anomaly-Based Detection features. These allow administrators to define thresholds for various traffic types and automatically detect unusual patterns like SYN floods, connection spikes, or packet anomalies.
In this guide, we’ll walk you through:
- How FortiGate detects and mitigates abnormal traffic
- What types of protection you can enable using DoS Policies
- How to create a rule to protect your self-hosted applications
- Key best practices for monitoring and adjusting DoS settings
Whether you’re hosting your own services or managing infrastructure for others, proper DDoS protection is not optional — it’s essential.
Understanding FortiGate’s DDoS Detection and Traffic Mitigation
FortiGate uses anomaly-based detection to monitor traffic patterns and identify traffic behavior in real time. Instead of relying solely on static signatures, this method inspects the rate and volume of packets — such as SYN, FIN, RST, UDP, ICMP, and others — to detect suspicious spikes or floods that deviate from expected norms.
Each type of traffic can be individually tracked, and FortiGate allows you to define custom thresholds. For example, you can set a maximum number of SYN packets per second per source IP. If this threshold is exceeded, the firewall can trigger specific actions such as:
- Block the offending IP temporarily
- Log the event for review and auditing
- Send alerts via email or SNMP
- Rate-limit the traffic to reduce load
Mitigation begins immediately upon detection. FortiGate can drop suspicious packets before they reach the internal network, reducing the burden on servers and protecting application uptime.
In addition to real-time filtering, FortiGate provides historical event logs and reports that help administrators analyze the nature of attempted attacks and fine-tune policies over time. This proactive and adaptive approach ensures a resilient defense against evolving DDoS threats.
What Types of Protection You Can Enable Using DoS Policies
FortiGate’s DoS Policy feature offers granular protection against various forms of network-layer and transport-layer denial-of-service attacks. These policies allow you to define inspection rules that monitor traffic on specific interfaces — typically the one facing the internet — and take automated action when malicious patterns are detected.
With DoS Policies, you can enable protection for the following types of traffic anomalies:
- SYN Flood – Protects against excessive TCP handshake attempts that can exhaust server resources.
- UDP Flood – Detects and blocks high-volume, connectionless traffic used to overwhelm applications.
- ICMP Flood – Prevents attackers from flooding your system with ping requests.
- RST and FIN Floods – Monitors abnormal rates of TCP connection teardown packets.
- Port Scan Detection – Identifies and mitigates scanning behavior used for reconnaissance.
- Session Flood – Limits the number of concurrent sessions a source can create in a given timeframe.
Each of these anomaly types can be configured with threshold values for:
- Log Only – Monitor the activity but allow the traffic.
- Block – Drop packets that exceed the threshold.
- Both Log and Block – Recommended for security-critical interfaces.
These protections are particularly effective for self-hosted applications, such as websites or services behind your FortiGate, where unexpected surges in traffic could indicate an active attack. By enabling the right mix of protections, FortiGate acts as a smart filter — stopping threats before they reach your internal infrastructure.

In this case, I reduced the thresholds because the location does not have high traffic volume, allowing for stricter limits without impacting legitimate users.
How to Create a Rule to Protect Your Self-Hosted Applications
To protect your self-hosted services (such as web servers, VPN gateways, or mail servers) behind a FortiGate firewall, you can create a DoS Policy that applies to the WAN interface and monitors traffic targeting internal servers. Here’s a step-by-step guide on how to configure it through the FortiGate GUI:
Step-by-Step FortiGate DoS Configuration
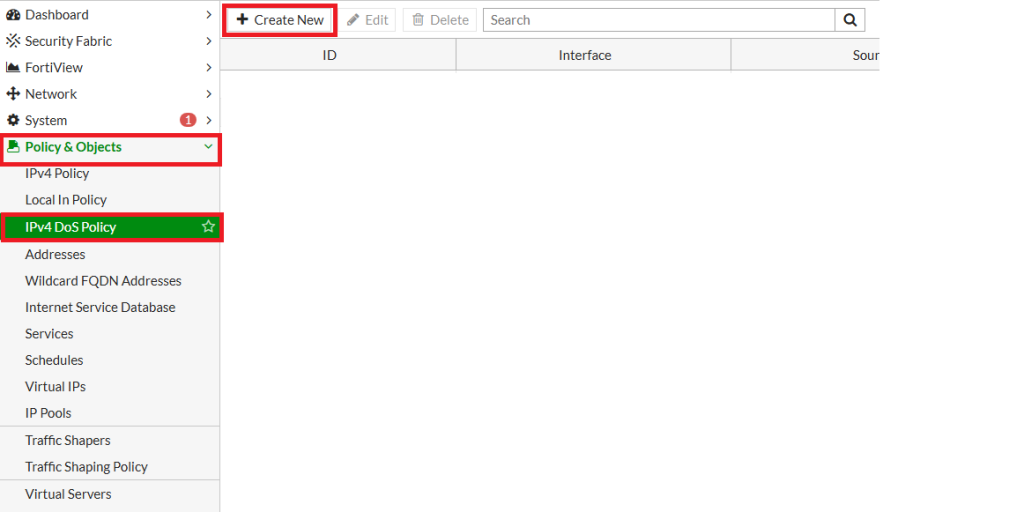
- Log in to the FortiGate Web Interface
- Navigate to:
Policy & Objects>DoS Policy - Click “Create New” to add a new rule.
- Configure the following settings:
- Incoming Interface:
Select your WAN interface (e.g.,port1orwan1) - Source Address:
Set toallor define a specific address group (optional) - Destination Address:
Select the server or service you want to protect (e.g.,web-server) - Service:
Choose relevant services likeHTTP,HTTPS,DNS, or useALLif needed
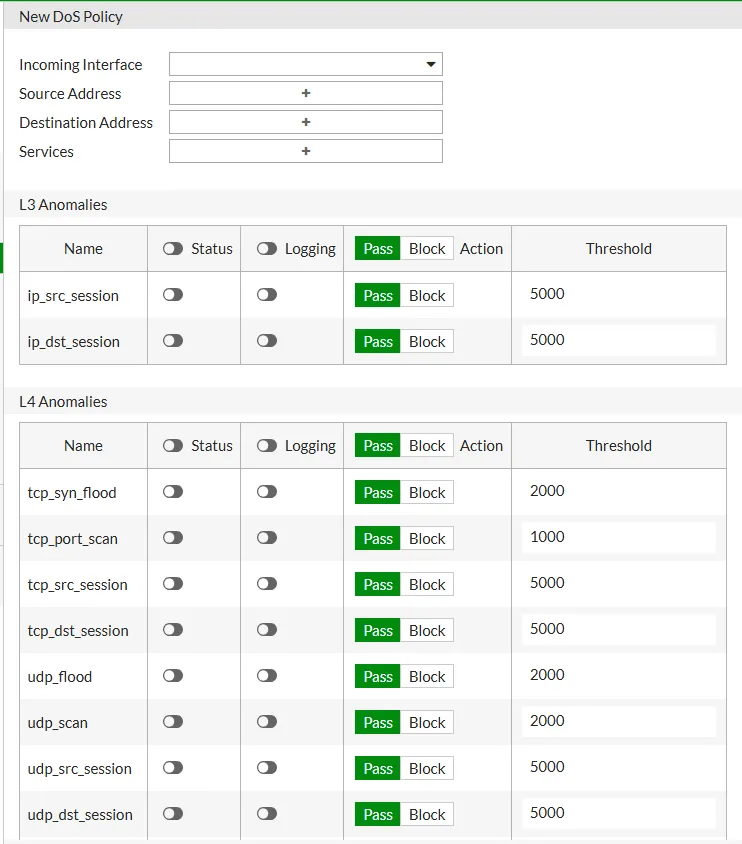
- Incoming Interface:
- Enable Anomaly Detection: Scroll down to the Anomaly Threshold section and configure detection rules for specific types of traffic:
- TCP_SYN_FLOOD: e.g., 1000 packets per second
- UDP_FLOOD: e.g., 500 packets per second
- ICMP_FLOOD: e.g., 200 packets per second
- Port Scan, Session Flood, etc.
- Status: Enable for checking
- Threshold (pps)
- Action:
Block,Pass - Logging
- Click OK to save and activate the policy.
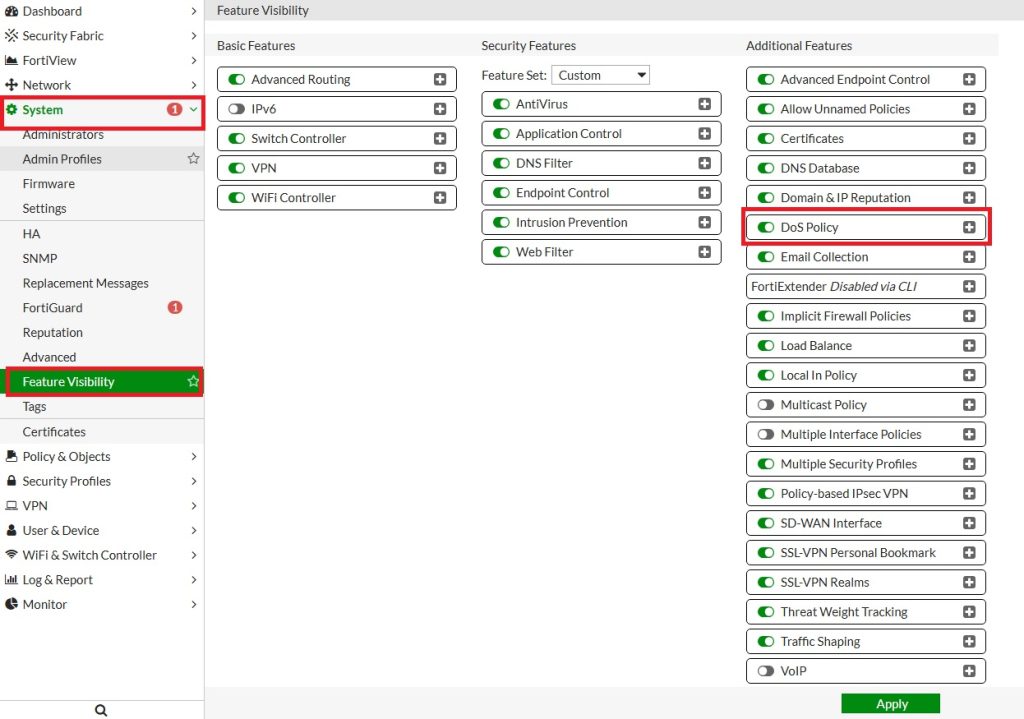
If IPv4 DoS Policy Feature is not Visible
If the DoS Policy option is not visible under Policy & Objects, you need to enable it manually:
Go to:System → Feature Visibility → Additional Features → Enable DoS Policy
This will make the DoS Policy feature available in the GUI for configuration.
If you are interested in more hidden features, check out my post about them at the link.
Optional – Testing the Rule
You can test the protection using controlled traffic generators from an external host to verify that your FortiGate correctly detects and logs abnormal traffic behavior.
Important Warning:
- Be extremely cautious when performing such tests, as they may violate local laws or ISP terms of service if misused or conducted outside your own infrastructure.
- DDoS test traffic can degrade network performance or cause service outages, even in controlled environments.
- Always perform tests only within your own network and under strictly controlled conditions, ideally in a lab or isolated test environment.
Testing is a powerful way to verify your configuration, but it should always be done responsibly and with full awareness of the risks involved.
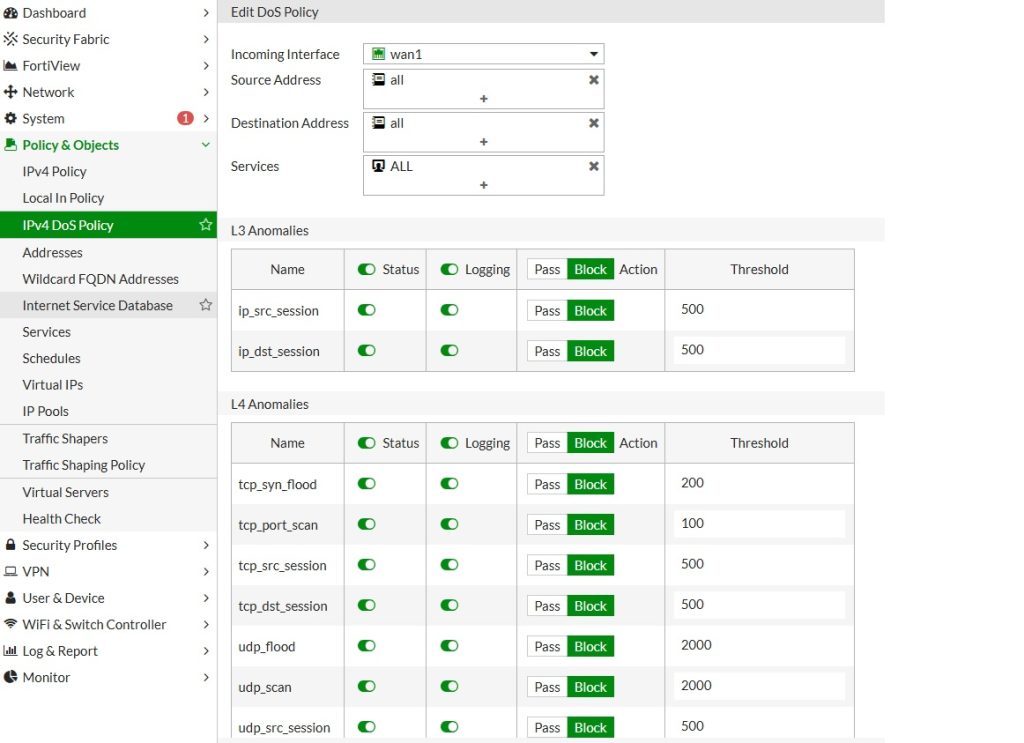
DDos Protection Configuration on My FortiGate Device
- Rule 3: Allows unrestricted access from my trusted public IP address (
HOST_HOME-1) without any rate limits or blocking. This ensures your home connection is never affected by DoS protections. - Rule 1: Applies strict DoS protection for all other source IP addresses accessing your network via the WAN interface. Traffic from these IPs is monitored and blocked if it exceeds defined anomaly thresholds.
This setup creates a clear exception for your trusted IP, while protecting your self-hosted applications and network from potential DDoS attacks originating from other sources.
config firewall DoS-policy
    edit 3
        set interface "wan1"
        set srcaddr "HOST_HOME-1"
        set dstaddr "all"
        set service "ALL"
        config anomaly
            edit "tcp_syn_flood"
                set threshold 2000
            next
            edit "tcp_port_scan"
                set threshold 1000
            next
            edit "tcp_src_session"
                set threshold 5000
            next
            edit "tcp_dst_session"
                set threshold 5000
            next
            edit "udp_flood"
                set threshold 2000
            next
            edit "udp_scan"
                set threshold 2000
            next
            edit "udp_src_session"
                set threshold 5000
            next
            edit "udp_dst_session"
                set threshold 5000
            next
            edit "icmp_flood"
                set threshold 250
            next
            edit "icmp_sweep"
                set threshold 100
            next
            edit "icmp_src_session"
                set threshold 300
            next
            edit "icmp_dst_session"
                set threshold 1000
            next
            edit "ip_src_session"
                set threshold 5000
            next
            edit "ip_dst_session"
                set threshold 5000
            next
            edit "sctp_flood"
                set threshold 2000
            next
            edit "sctp_scan"
                set threshold 1000
            next
            edit "sctp_src_session"
                set threshold 5000
            next
            edit "sctp_dst_session"
                set threshold 5000
            next
        end
    next
    edit 1
        set interface "wan1"
        set srcaddr "all"
        set dstaddr "all"
        set service "ALL"
        config anomaly
            edit "tcp_syn_flood"
                set status enable
                set log enable
                set action block
                set threshold 200
            next
            edit "tcp_port_scan"
                set status enable
                set log enable
                set action block
                set threshold 100
            next
            edit "tcp_src_session"
                set status enable
                set log enable
                set action block
                set threshold 500
            next
            edit "tcp_dst_session"
                set status enable
                set log enable
                set action block
                set threshold 500
            next
            edit "udp_flood"
                set status enable
                set log enable
                set action block
                set threshold 2000
            next
            edit "udp_scan"
                set status enable
                set log enable
                set action block
                set threshold 2000
            next
            edit "udp_src_session"
                set status enable
                set log enable
                set action block
                set threshold 500
            next
            edit "udp_dst_session"
                set status enable
                set log enable
                set action block
                set threshold 500
            next
            edit "icmp_flood"
                set status enable
                set log enable
                set action block
                set threshold 250
            next
            edit "icmp_sweep"
                set status enable
                set log enable
                set action block
                set threshold 100
            next
            edit "icmp_src_session"
                set status enable
                set log enable
                set action block
                set threshold 300
            next
            edit "icmp_dst_session"
                set status enable
                set log enable
                set action block
                set threshold 100
            next
            edit "ip_src_session"
                set status enable
                set log enable
                set action block
                set threshold 500
            next
            edit "ip_dst_session"
                set status enable
                set log enable
                set action block
                set threshold 500
            next
            edit "sctp_flood"
                set status enable
                set log enable
                set action block
                set threshold 200
            next
            edit "sctp_scan"
                set status enable
                set log enable
                set action block
                set threshold 100
            next
            edit "sctp_src_session"
                set status enable
                set log enable
                set action block
                set threshold 500
            next
            edit "sctp_dst_session"
                set status enable
                set log enable
                set action block
                set threshold 500
            next
        end
    next
end
Key Best Practices for Monitoring and Adjusting DoS Settings
To ensure your FortiGate firewall provides effective and reliable DDoS protection, it’s important not only to configure DoS Policies, but also to monitor and fine-tune them regularly. Overly strict thresholds can block legitimate traffic, while lenient settings might let attacks through. Here are some key best practices:
- Start with Logging Mode
When implementing new DoS policies, begin with “log only” mode to observe traffic behavior without enforcing blocks. This helps you identify normal traffic baselines. - Analyze Event Logs Frequently
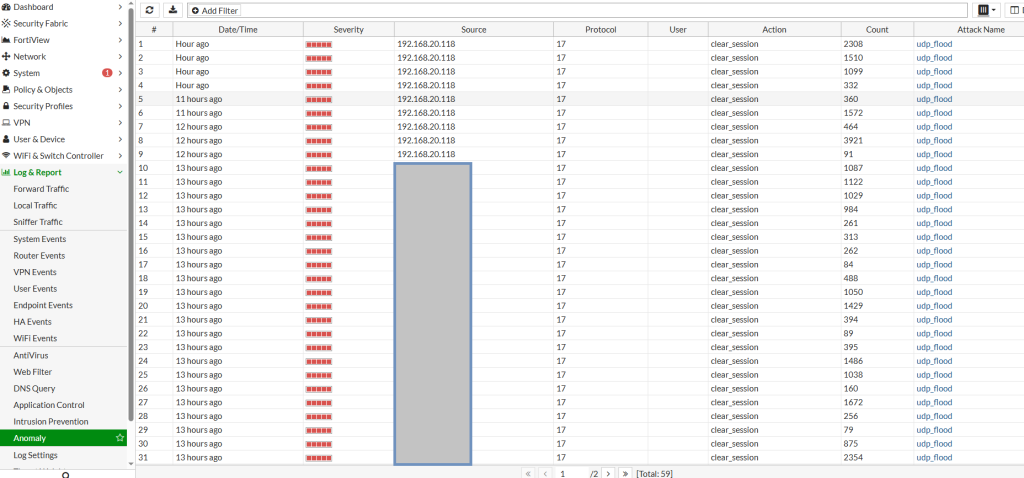
Use the Log & Report > Anomaly section in the GUI to review detected anomalies. This will show you which IPs triggered alerts, what type of traffic was involved, and whether thresholds need to be adjusted. - Use Interface-Specific Policies
Apply DoS Policies only on the WAN interface (usuallyport1orwan1) to inspect incoming traffic. Internal interfaces typically don’t need these protections. - Set Realistic Thresholds
Configure packet thresholds based on the average traffic your applications receive. Consider the number of users, peak hours, and expected session counts. - Enable Notifications
Configure alerts via email or SNMP to be notified in real-time when a DoS threshold is crossed. This allows for quick investigation and response. - Update Firmware Regularly
FortiOS updates often include improvements to anomaly detection and DoS logic. Keeping your device up to date ensures maximum effectiveness. - Combine with Other Security Features
Use DoS policies together with IP reputation, Geo-IP filters, and Web Application Firewall (WAF) for a layered defense approach.
By continuously monitoring and adjusting your DoS policies, you can maintain strong protection while minimizing false positives and service disruption. An adaptive security posture is the best defense against ever-changing DDoS tactics.


