• Contact
  • About Me
  • Privacy Policy
DefenceDev
  • Home
  • Blog
  • Linux Tutorials
    • Bash Scripting Lessons
    • Commands
    • Networking
  • Solutions
    • Docker
  • Network Tutorials
    • FortiGate
    • MikroTik
  • Projects
    • AdGuard
    • Immich
    • Nextcloud
    • WordPress
  • Cloud
  • Video Tutorials
    • YouTube Channel
    • MikroTik Videos
No Result
View All Result
DefenceDev
No Result
View All Result
ADVERTISEMENT
Home Network Tutorials FortiGate

Configure FortiGate as a DHCP Server via GUI and CLI

neo by neo
May 27, 2025
in FortiGate
0
Configure FortiGate as a DHCP Server via GUI and CLI

Configure FortiGate as a DHCP Server via GUI and CLI

0
SHARES
225
VIEWS
Share on FacebookShare on Twitter
ADVERTISEMENT

FortiGate as a DHCP Server

Configuring FortiGate as a DHCP server allows network administrators to easily manage IP address distribution within their network. In this article, we will explore how to configure FortiGate as a DHCP server both via the GUI and CLI, including some advanced configuration options.

A DHCP (Dynamic Host Configuration Protocol) server is used to dynamically assign IP addresses to devices on a network. FortiGate firewalls, aside from their security capabilities, can also act as DHCP servers.

DHCP GUI Configuration

To configure FortiGate as a DHCP server through the graphical user interface (GUI), follow these steps:

Step 1: Access the FortiGate Web Interface

  • Open a web browser and enter the IP address of the FortiGate device.
  • Log in using your administrator credentials.

Step 2: Navigate to DHCP Server Settings:

  • Go to Network > Interfaces.
  • Select the interface where you want to enable the DHCP server (e.g., internal interface or LAN interface).
  • Click on the Edit button for that interface.
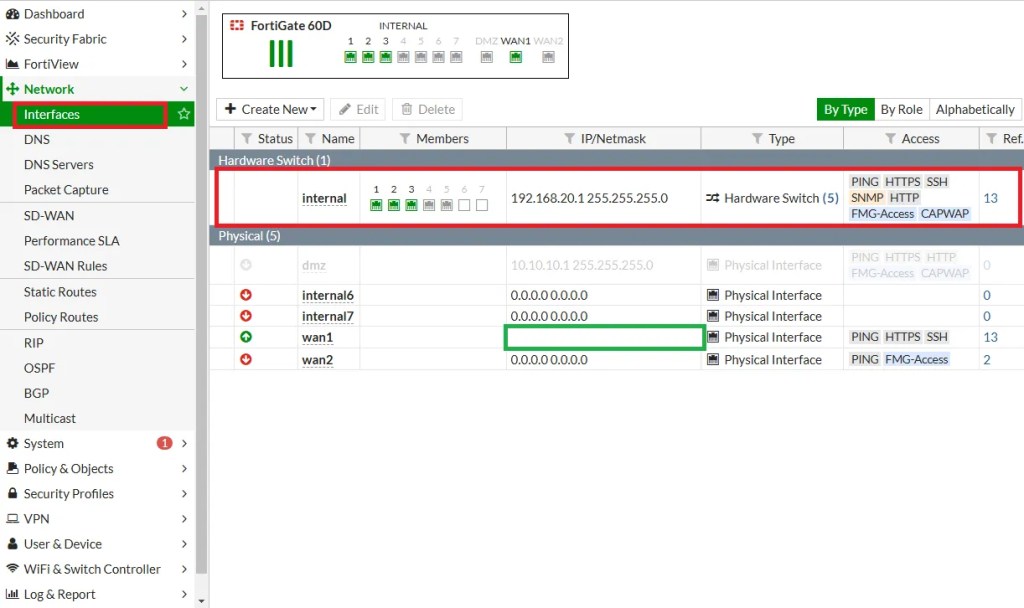
FortiGate Network
FortiGate Network

Step 3: Enable DHCP Server

  • In the Edit Interface window, scroll down to the DHCP Server section.
  • Check the Enable DHCP Server box to activate the DHCP server on that interface.

Step 4: Configure DHCP Server Settings:

  • DHCP Range: Specify the range of IP addresses that the server will assign to clients (e.g., 192.168.20.110 to 192.168.20.210).
  • Subnet Mask: Set the subnet mask for the DHCP clients (e.g., 255.255.255.0).
  • Gateway IP: Define the default gateway IP address for the clients (usually the IP address of the FortiGate interface).
  • DNS Server: Optionally, configure the DNS servers that the clients should use. In my case I am using Google DNS Servers.
FortiGate Network Interfaces

If you need to make IP ADress Reservation you can add MAC Adress of device and IP Adress in the “MAC Reservatrion” Table:

FortiGate DHCP Advanced
FortiGate DHCP Advanced Settings

Step 5: Save the Configuration:

  • After entering the necessary information, click OK to save the settings.

DHCP CLI Configuration

For administrators who prefer the command-line interface (CLI) or need to automate the configuration, setting up a DHCP server via CLI is also straightforward.

Step 1: Access the FortiGate CLI

  • You can access the CLI through the console or SSH by connecting to the FortiGate device.

Step 2: Enable the DHCP Server on an Interface

Use the following command to configure the DHCP server on a specific interface (e.g., internal):

    fgt-remote1 # config system dhcp server
    fgt-remote1 (server) # edit 1
    fgt-remote1 (1) # get
    id                  : 1
    status              : enable
    lease-time          : 604800
    mac-acl-default-action: assign
    forticlient-on-net-status: enable
    dns-service         : specify
    wifi-ac1            : 0.0.0.0
    wifi-ac2            : 0.0.0.0
    wifi-ac3            : 0.0.0.0
    ntp-service         : specify
    domain              :
    wins-server1        : 0.0.0.0
    wins-server2        : 0.0.0.0
    default-gateway     : 192.168.20.1
    next-server         : 0.0.0.0
    netmask             : 255.255.255.0
    interface           : internal
    ip-range:
        == [ 1 ]
        id:     1
    timezone-option     : default
    tftp-server         :
    filename            :
    options:
    server-type         : regular
    conflicted-ip-timeout: 1800
    auto-configuration  : enable
    ddns-update         : disable
    vci-match           : disable
    exclude-range:
    reserved-address:
    dns-server1         : 8.8.8.8
    dns-server2         : 8.8.4.4
    dns-server3         : 0.0.0.0
    ntp-server1         : 0.0.0.0
    ntp-server2         : 0.0.0.0
    ntp-server3         : 0.0.0.0
    
    
    fgt-remote1 (1) #
    

    In this configuration:

    • interface: The network interface where the DHCP server is enabled (e.g., internal).
    • lease-time: The lease time for IP addresses.
    • subnet: The network address and subnet mask.
    • range-start and range-end: The start and end of the IP address range that the DHCP server will assign to clients.
    • default-gateway: The default gateway for clients.
    • dns-server1 and dns-server2: DNS server addresses for clients.

    Step 3: Verify DHCP Server Configuration

    After configuring the DHCP server, you can verify the settings with the following command: show system dhcp server

    fgt-remote1 # show system dhcp server
    config system dhcp server
        edit 1
            set default-gateway 192.168.20.1
            set netmask 255.255.255.0
            set interface "internal"
            config ip-range
                edit 1
                    set start-ip 192.168.20.110
                    set end-ip 192.168.20.210
                next
            end
            set timezone-option default
            set dns-server1 8.8.8.8
            set dns-server2 8.8.4.4
        next
    end
    

    Conclusion

    Configuring FortiGate as a DHCP server, either via the GUI or CLI, is a simple yet powerful way to manage IP address allocation for your network devices. By following the steps outlined above, you can easily set up a DHCP server, customize the IP address range, and apply advanced options like static IP mapping, TFTP server configuration, and DHCP relay. The flexibility offered by FortiGate allows you to fine-tune your DHCP settings to meet the specific needs of your network.

    ADVERTISEMENT
    ADVERTISEMENT
    ADVERTISEMENT

    In next article we will write about DHCP special atributes. You can check my other FortiGate post on this link.

    About The Author

    neo

    See author's posts

    Tags: fortigate
    ADVERTISEMENT
    Previous Post

    Fortinet FortiGate Logging: Log Management and Best Practices

    Next Post

    Why Upgrade to a FortiGate Firewall? Enhanced Security, Visibility & Performance for Businesses

    neo

    neo

    Next Post
    Why Upgrade to a FortiGate Firewall? Enhanced Security, Visibility & Performance for Businesses

    Why Upgrade to a FortiGate Firewall? Enhanced Security, Visibility & Performance for Businesses

    Follow Us

    • Trending
    • Comments
    • Latest
    MikroTik: Export Configuration in Text File

    MikroTik: Export Configuration in Text File

    Fortinet FortiGate: Static Route Configuration via GUI and CLI

    Fortinet FortiGate: Static Route Configuration via GUI and CLI

    Immich: Installation on Ubuntu 22.04

    Immich: Installation on Ubuntu 22.04

    Fortinet FortiGate Upgrade Path Tool

    Fortinet FortiGate Upgrade Path Tool

    NextCloud: Port Forwarding - Essential Ports for Smooth Functionality

    NextCloud: Port Forwarding – Essential Ports for Smooth Functionality and Remote Access

    Organizing and Managing Photos with Immich: Features I Use

    Organizing and Managing Photos with Immich: Features I Use

    Install Ubuntu 22.04 on Oracle VM Virtual Box

    Install Ubuntu 22.04 on Oracle VM Virtual Box

    Linux Directories: cd (Change Directory), pwd (Print Working Directory), mkdir (Make Directory)

    Linux Directories: cd (Change Directory), pwd (Print Working Directory), mkdir (Make Directory)

    Install WordPress on Raspberry Pi 4 with Docker (Ubuntu 22.04)

    Install WordPress on Raspberry Pi 4 with Docker (Ubuntu 22.04)

    Install Nextcloud on Raspberry Pi 4 with Docker (Ubuntu 22.04)

    Install Nextcloud on Raspberry Pi 4 with Docker (Ubuntu 22.04)

    Install Nginx Proxy Manager on Raspberry Pi 4 with Docker (Ubuntu 22.04)

    Install Nginx Proxy Manager on Raspberry Pi 4 with Docker (Ubuntu 22.04)

    Install Docker on Raspberry Pi 4 with Ubuntu 22.04

    Install Docker on Raspberry Pi 4 with Ubuntu 22.04

    Recent News

    Install WordPress on Raspberry Pi 4 with Docker (Ubuntu 22.04)

    Install WordPress on Raspberry Pi 4 with Docker (Ubuntu 22.04)

    Install Nextcloud on Raspberry Pi 4 with Docker (Ubuntu 22.04)

    Install Nextcloud on Raspberry Pi 4 with Docker (Ubuntu 22.04)

    Install Nginx Proxy Manager on Raspberry Pi 4 with Docker (Ubuntu 22.04)

    Install Nginx Proxy Manager on Raspberry Pi 4 with Docker (Ubuntu 22.04)

    Install Docker on Raspberry Pi 4 with Ubuntu 22.04

    Install Docker on Raspberry Pi 4 with Ubuntu 22.04

    MikroTik: Check Your Wireless Password

    MikroTik: Check Your Wireless Password

    ADVERTISEMENT

    DefenceDev Tutorials

    defencedev Logo

    Whether you’re just starting or looking to expand your skills, I hope you find useful information and engaging discussions here. Let me take you through my journey and the goals behind this space!

    Follow Us

    Browse by Category

    • Blog
    • Cloud
      • Private
    • Linux Tutorials
      • Bash Scripting Tutorials
      • Commands
      • Networking
    • Network Tutorials
      • FortiGate
      • MikroTik
    • Projects
      • AdGuard
      • Immich
      • Nextcloud
      • WordPress
    • Solutions
      • Docker
    • Video Tutorials
      • MikroTik Videos

    Recent News

    Install WordPress on Raspberry Pi 4 with Docker (Ubuntu 22.04)

    Install WordPress on Raspberry Pi 4 with Docker (Ubuntu 22.04)

    Install Nextcloud on Raspberry Pi 4 with Docker (Ubuntu 22.04)

    Install Nextcloud on Raspberry Pi 4 with Docker (Ubuntu 22.04)

    • Site Map
    • Privacy Policy
    • Facebook Page
    • Disclaimer
    • Contact
    • About Me

    © 2025 defencedev.com - All rights reserved.

    No Result
    View All Result
    • Home
    • Blog
    • Linux Tutorials
      • Bash Scripting Lessons
      • Commands
      • Networking
    • Solutions
      • Docker
    • Network Tutorials
      • FortiGate
      • MikroTik
    • Projects
      • AdGuard
      • Immich
      • Nextcloud
      • WordPress
    • Cloud
    • Video Tutorials
      • YouTube Channel
      • MikroTik Videos

    © 2025 defencedev.com - All rights reserved.