
DNS (Domain Name System) Server
Domain Name System (DNS) is a crucial service in networking that translates human-readable domain names (like https://defencedev.com) into IP addresses. Proper DNS configuration on network devices is essential reliable name resolution, ensuring users can access web and other services. In this article, we’ll guide you through configuring DNS on a FortiGate firewall.
More information about FortiGate DNS configuration you can found on the link .
Steps to Configure DNS Server on FortiGate Interface
Step 1: Access the FortiGate Web Interface
- Open a web browser and enter the IP address of your FortiGate device.
- Login using your admin credentials.
Step 2: Navigate to DNS Settings
Once logged in, go to:
- Network > DNS.
- You will see options for both System DNS and DNS servers.
Step 3: Configure System DNS
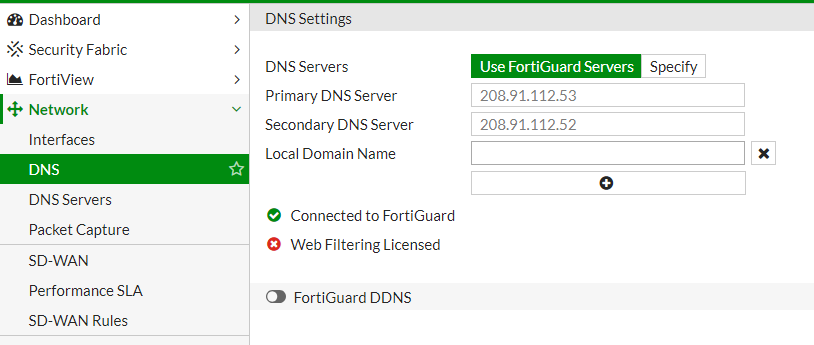
The System DNS servers are used by FortiGate itself to resolve domain names for its services (e.g., checking updates, remote logging). To configure:
- Under Network > DNS:
- Select System DNS.
- Enter the primary and secondary DNS servers. Common choices include Google’s DNS (8.8.8.8 and 8.8.4.4) or Cloudflare’s DNS (1.1.1.1 and 1.0.0.1) or use FortiGuard Servers.
- Click Apply to save the settings.
Step 4: Configure DNS Forwarding
FortiGate can also act as a DNS forwarder, meaning it can resolve DNS queries for devices on the network. This offloads DNS lookups to a trusted source and reduces DNS-related traffic.
To configure DNS forwarding:
- Go to Network > DNS Servers.
- In the section DNS Service on Interface create a new DNS service on your internal network interface.
- If you need to resolve something from local netowork add it in the section DNS Database
- Once configured, click Apply.


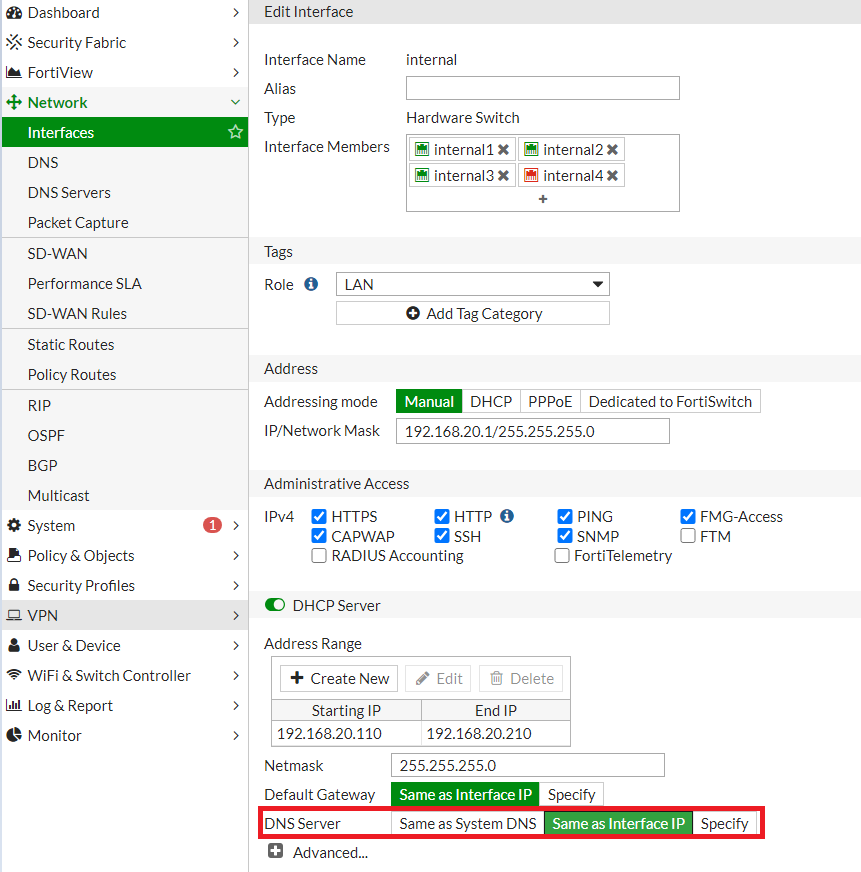
Step 5: Enable DNS on Local interface
- Go to Network > Interface
- Select Internal interface.
- In section DNS Server select Same as Interface IP to use FortiGate DNS Server in your local network.
Adding a Local DNS Override on FortiGate (DNS Database Entry)
If you want a domain like raspberry.defencedev.com to resolve to a local IP address (e.g., 192.168.20.50) within your network, you can configure a DNS override on the FortiGate firewall.
Steps to DNS Override Configuration
Step 1: Add a Local DNS Record in FortiGate DNS Database
- Go to Network > DNS Database in the FortiGate GUI.
- Click Create New to create a new DNS zone.
- Fill in the DNS zone details:
- Type: Select Master (since FortiGate will be authoritative for this zone)
- View: Select Shadow (for most local network use cases, Public is appropriate)
- DNS Zone: Enter the main domain, for example:
defencedev.com - Domain Name: Same as the DNS Zone, e.g.,
defencedev.com - Hostname of Primary Master:
dns - Contact Email Address: hostmaster or your email, but formatted with a dot instead of
@(e.g.,admin.defencedev.com) - TTL: Leave default or set to something like
1day - Authoritative: Select Yes (because FortiGate is authoritative for this zone)
- Click OK or Apply to save the DNS zone.
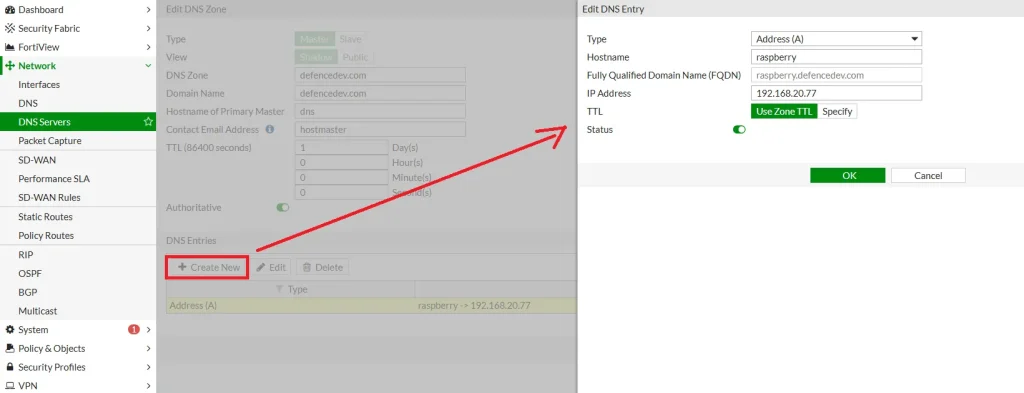
Step 2: Adding DNS Entries to the Zone
Once the DNS zone is created, you can add DNS records under it:
- In the Add DNS Entry section:
- Type: Choose
A(for IPv4 address) - Hostname: Enter the hostname part, e.g.,
raspberry - Fully Qualified Domain Name (FQDN): Enter the full domain if needed – in my case is automatically done, e.g.,
raspberry.defencedev.com - IP Address: Enter the local IP address of your device, e.g.,
192.168.20.77 - TTL: Leave default (e.g.,
3600) - Status: Enable the record
- Click Add or Save.
What This Does
- FortiGate will now be authoritative for the
defencedev.comzone and answer DNS queries for that domain. - When clients on your network try to access
raspberry.defencedev.com, FortiGate will resolve it to the local IP192.168.1.50. - This allows devices inside your network to reach your Raspberry Pi (or other local device) by name without going to external DNS servers.


