• Contact
  • About Me
  • Privacy Policy
  • Disclaimer
DefenceDev
  • Home
  • Blog
  • Linux Tutorials
    • Bash Scripting Lessons
    • Commands
    • Networking
    • Bash Scripts
  • Solutions
    • Docker
  • Network Tutorials
    • FortiGate
    • MikroTik
  • Projects
    • AdGuard
    • Immich
    • Nextcloud
    • WordPress
  • Cloud
  • Video Tutorials
    • YouTube Channel
    • MikroTik Videos
  • Web Tools
No Result
View All Result
DefenceDev
No Result
View All Result
ADVERTISEMENT
Home Network Tutorials FortiGate

Fortinet FortiGate: Packet Capture from CLI and GUI

neo by neo
September 11, 2025
in FortiGate
0
FortiGate Packet Capture from 'Network' and 'Packet Capture' sub menu.

FortiGate Packet Capture settings

0
SHARES
1.2k
VIEWS
Share on FacebookShare on LinkedIn
Table of Contents
  • Packet Capture
  • Packet Capture from CLI
    • Packet Capture from CLI – Example 1
    • Packet Capture from CLI – Example 2
    • To capture to a file for later analysis, use:
  • Packet Capture from GUI

Packet Capture

Packet capture on FortiGate firewalls is an essential tool for network administrators looking to diagnose issues and monitor network traffic. FortiGate offers packet capture functionality through both the Command Line Interface (CLI) and Graphical User Interface (GUI), each with unique advantages.

Packet Capture from CLI

The CLI allows for detailed and flexible packet capture commands, useful for advanced troubleshooting. To start a packet capture in CLI, use the diag sniffer packet <interface> <filter> <level> command. Here’s a basic example:

diagnose sniffer packet <interface> '<filter>' <verbosity> <count> <timestamp> <frame size>

Parameters Explanation:

  • <interface>:
    • Specifies the network interface on which to capture packets (e.g., port1, wan1, or any for all interfaces).
    • Example: wan1 captures only packets on the wan1 interface.
  • <filter>:
    • This is a BPF (Berkeley Packet Filter) filter expression to limit captured traffic. It follows the same syntax as a filter in Wireshark or tcpdump, letting you specify conditions like IP addresses, protocols, or ports.
    • Example: 'host 192.168.1.10 and port 80' captures traffic only to or from IP 192.168.1.10 on port 80.
  • <verbosity>:
    • Controls the level of detail in the capture output. It ranges from 1 to 6.
      • 1: Displays only basic packet headers (minimal detail).
      • 4: Shows full packet details (recommended for in-depth troubleshooting) and interface name.
      • 6: Includes debug-level information (very verbose, often used for debugging).
    • Example: 4 for detailed packet information and ingress and egress interfaces.
  • <count>:
    • Sets the maximum number of packets to capture before stopping.
    • Example: 100 captures only 100 packets and then stops.
  • <timestamp>:
    • Controls the display format of timestamps.
      • 0: No timestamp.
      • 1: Unix timestamp in seconds.
      • a: prints absolute timestamp
      • Example: 1 for Unix timestamps.
  • <frame size>:
    • Sets the maximum size of each captured packet. This truncates packets beyond the specified size, capturing only the headers or a portion of the payload if needed.
    • Example: 100 captures the first 100 bytes of each packet.

Packet Capture from CLI – Example 1

diagnose sniffer packet any 'host 192.168.1.10' 4

In this command, any indicates all interfaces, host specifies a targeted IP, and 4 sets the verbosity level. Results display real-time packets with rich detail, helping pinpoint issues like latency, dropped packets, and unexpected traffic patterns.

Packet Capture from CLI – Example 2

diagnose sniffer packet any 'host 192.168.1.10' 4 100 1 100

Explanation: This command captures packets on all interfaces (any), filtered for IP 192.168.1.10. It uses verbosity level 4 for detailed information, captures up to 100 packets, includes Unix timestamps (1), and limits packet size to 100 bytes.

To capture to a file for later analysis, use:

diag sniffer packet <interface> 'filter' <level> file /path/filename.pcap

Packet Capture from GUI

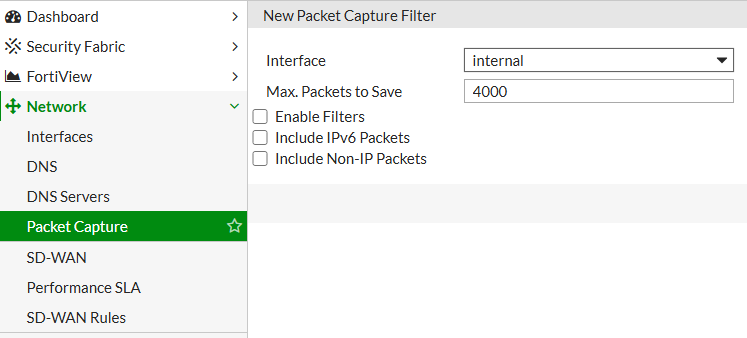
The GUI provides a more accessible interface for administrators unfamiliar with CLI commands. Go to Network > Packet Capture, select the interface, apply filters, and start the capture. The GUI option is ideal for quick captures and allows for saving and downloading captures in .pcap format, compatible with Wireshark for in-depth analysis.

ADVERTISEMENT
Network Packet Capture from GUI
Packet Capture from GUI

About The Author

neo

See author's posts

ADVERTISEMENT
Tags: fortigate
ADVERTISEMENT
Previous Post

How to Configure VLAN and Attach It to a VM in VMware ESXi

Next Post

MikroTik: Configure DHCP Server and Settings on Interface

neo

neo

Related Posts

FortiGate Country Address Object Generator – Block or Allow Access by Country
FortiGate

FortiGate Country Address Object Generator – Block or Allow Access by Country

Home Lab with Fortinet FortiGate 60D Firewall
FortiGate

Home Lab with Fortinet FortiGate 60D Firewall

My Ultimate FortiGate Command Cheat Sheet
FortiGate

My Ultimate FortiGate Command Cheat Sheet

Setting Up IPS (Intrusion Detection System) Profiles on FortiGate to Detect Web Attacks
FortiGate

Setting Up IPS (Intrusion Detection System) Profiles on FortiGate to Detect Web Attacks

Protect a Self-Hosted Application from Brute Force Attacks with FortiGate
FortiGate

How to Protect a Self-Hosted Application from Brute Force Attacks with FortiGate

FortiGate DDoS Protection: Configure DoS Policies to Secure Self-Hosted Applications
FortiGate

FortiGate DDoS Protection: Configure DoS Policies to Secure Self-Hosted Applications

Next Post
A screenshot of WinBox showing the process of creating 'New DHCP Server'.

MikroTik: Configure DHCP Server and Settings on Interface

Recommended

Automating Linux Server Reboot with Ansible

Automating Linux Server Reboot with Ansible

MikroTik: OpenVPN Client Failover Script

MikroTik: OpenVPN Client Failover Script

Install Portainer on Ubuntu 24.04 Using Docker Compose

Install Portainer on Ubuntu 24.04 Using Docker Compose

FortiGate Country Address Object Generator – Block or Allow Access by Country

FortiGate Country Address Object Generator – Block or Allow Access by Country

View & Copy Image Metadata Online – Camera & GPS Info

View & Copy Image Metadata Online – Camera & GPS Info

Categories

  • Blog
  • Cloud
    • Private
  • Linux Tutorials
    • Bash Scripting Tutorials
    • Commands
    • Networking
  • Network Tutorials
    • FortiGate
    • MikroTik
  • Projects
    • AdGuard
    • Immich
    • Nextcloud
    • WordPress
  • Solutions
    • Docker
  • Video Tutorials
    • MikroTik Videos
  • Web Tools
ADVERTISEMENT

DefenceDev Tutorials

defencedev Logo

Whether you’re just starting or looking to expand your skills, I hope you find useful information and engaging discussions here. Let me take you through my journey and the goals behind this space!

Follow Us

Recent News

Install Portainer on Ubuntu 24.04 Using Docker Compose

Install Portainer on Ubuntu 24.04 Using Docker Compose

FortiGate Country Address Object Generator – Block or Allow Access by Country

FortiGate Country Address Object Generator – Block or Allow Access by Country

  • Site Map
  • Privacy Policy
  • Facebook Page
  • Disclaimer
  • Contact
  • About Me

© 2025 defencedev.com - All rights reserved.

No Result
View All Result
  • Home
  • Blog
  • Linux Tutorials
    • Bash Scripting Lessons
    • Commands
    • Networking
    • Bash Scripts
  • Solutions
    • Docker
  • Network Tutorials
    • FortiGate
    • MikroTik
  • Projects
    • AdGuard
    • Immich
    • Nextcloud
    • WordPress
  • Cloud
  • Video Tutorials
    • YouTube Channel
    • MikroTik Videos
  • Web Tools

© 2025 defencedev.com - All rights reserved.