• Contact
  • About Me
  • Privacy Policy
DefenceDev
  • Home
  • Blog
  • Linux Tutorials
    • Bash Scripting Lessons
    • Commands
    • Networking
  • Solutions
    • Docker
  • Network Tutorials
    • FortiGate
    • MikroTik
  • Projects
    • AdGuard
    • Immich
    • Nextcloud
    • WordPress
  • Cloud
  • Video Tutorials
    • YouTube Channel
    • MikroTik Videos
No Result
View All Result
DefenceDev
No Result
View All Result
ADVERTISEMENT
Home Network Tutorials FortiGate

Fortinet FortiGate: Static Route Configuration via GUI and CLI

neo by neo
May 27, 2025
in FortiGate
0
Fortinet FortiGate: Static Route Configuration via GUI and CLI

Fortinet FortiGate: Static Route Configuration via GUI and CLI

0
SHARES
1.2k
VIEWS
Share on FacebookShare on Twitter
ADVERTISEMENT

FortiGate Static Route Configuration

When managing network devices like Fortinet FortiGate, configuring routing is a crucial step in ensuring that traffic flows seamlessly within and beyond your network. Among the various routing options available, static routes serve as a fundamental tool for defining precise paths for data to reach specific destinations.

What are Static Routes?

Static routes are manually configured routes that define specific paths for network traffic to follow. Unlike dynamic routing protocols, which automatically adjust routes based on current network conditions, static routes require manual configuration. This makes them simple and predictable, ideal for networks with stable topologies or specific routing requirements.

Benefits of Static Routes

  • Simplicity: Static routes are easy to configure and maintain, making them ideal for small networks or straightforward routing needs.
  • Predictability: Because they do not change unless manually altered, static routes offer predictable paths for network traffic.
  • Control: Administrators have complete control over the routing path, allowing for customized traffic flow.

Static Route Configuration Examples

Let’s consider a scenario where you want to configure a static route to direct traffic destined for the 192.168.10.0/24 network through a gateway at 192.168.20.223 using the internal interface. It is very important that the FortiGate can communicate with the defined gateway 192.168.20.223.

Option 1: Static Route CLI (Command Line Interface) Configuration

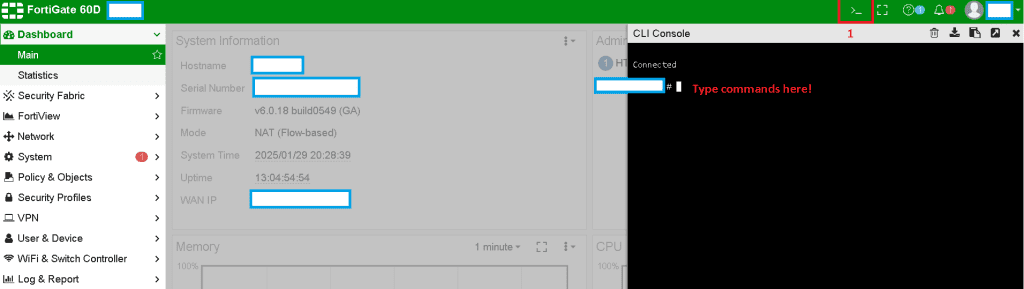
Step 1: Connect to the CLI Interface on FortiGate Firewall

Use Putty to sttart SSH Session or FortiGate CLI Console on your Fortinet Firewall GUI to access to the CLI Interface.On CLI Console you can type commands to change or add static routes or any other configuration

Open FortiGate CLI
Open FortiGate CLI

Step 2: Add Route in Your Configuration

Adjust your Gateway and which network you want to communicate through that gateway and type the following commands, line by line:

config router static
    edit 1
        set dst 192.168.10.0 255.255.255.0
        set gateway 192.168.20.223
        set device internal
        set distance 10
    next
end

If you are not sure which routes are configured, check it with the following command:

fgt-at # config router static


fgt-at (static) # show
config router static
    edit 1
        set dst 192.168.19.0 255.255.255.0
        set gateway 192.168.20.112
        set device "internal"
    next
    edit 2
        set dst 192.168.10.0 255.255.255.0
        set distance 4
        set device "toHQ-1"
    next
    edit 3
        set dst 192.168.11.0 255.255.255.0
        set device "toHQ-2"
    next
end

If you would like to check more details about existing route, type the following command:

fgt-at # config router static

fgt-at (static) # edit 3

fgt-at (3) # get
seq-num             : 3
status              : enable
dst                 : 192.168.11.0 255.255.255.0
distance            : 10
weight              : 0
priority            : 0
device              : toHQ-2
comment             :
blackhole           : disable
dynamic-gateway     : disable
virtual-wan-link    : disable
link-monitor-exempt : disable
bfd                 : disable

Option 2: Static Route Web Interface Configuration

FortiGate Static Route

1: Access the FortiGate Management Interface

  • Log in to your FortiGate unit through the web-based GUI

2: Navigate to the Network Section

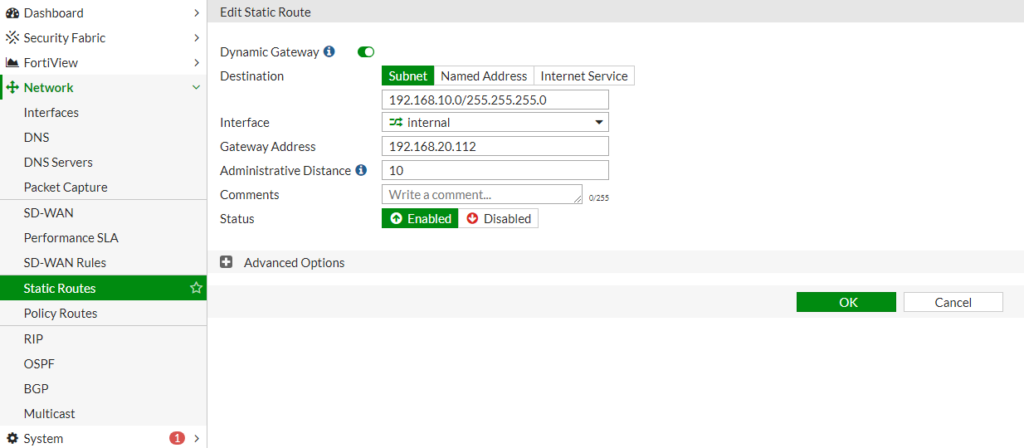
In the GUI, go to Network > Static Routes.

ADVERTISEMENT
ADVERTISEMENT
ADVERTISEMENT

Check screenshot above.

3: Add a New Static Route

  • In the GUI, click on Create New to open the new route configuration page.

4: Configure the Route Parameters

  • Destination IP/Netmask: Specify the destination network and its subnet mask.
  • Gateway: Enter the IP address of the next hop gateway.
  • Interface: Select the outgoing interface for the traffic.
  • Distance: Set the administrative distance for the route, which determines its priority relative to other routes.

5: Save the Configuration

  • Click OK to save the new static route.

At this link, you can check my post about Routing Best Practices.

About The Author

neo

See author's posts

Tags: fortigate
ADVERTISEMENT
Previous Post

Fortinet FortiGate: Port Forwarding for HTTPS NAT Configuration

Next Post

How to Extend Partition on Ubuntu with fdisk

neo

neo

Next Post
How to Extend Partition on Ubuntu with fdisk

How to Extend Partition on Ubuntu with fdisk

Follow Us

  • Trending
  • Comments
  • Latest
MikroTik: Export Configuration in Text File

MikroTik: Export Configuration in Text File

Fortinet FortiGate: Static Route Configuration via GUI and CLI

Fortinet FortiGate: Static Route Configuration via GUI and CLI

Immich: Installation on Ubuntu 22.04

Immich: Installation on Ubuntu 22.04

Fortinet FortiGate Upgrade Path Tool

Fortinet FortiGate Upgrade Path Tool

NextCloud: Port Forwarding - Essential Ports for Smooth Functionality

NextCloud: Port Forwarding – Essential Ports for Smooth Functionality and Remote Access

Organizing and Managing Photos with Immich: Features I Use

Organizing and Managing Photos with Immich: Features I Use

Install Ubuntu 22.04 on Oracle VM Virtual Box

Install Ubuntu 22.04 on Oracle VM Virtual Box

Linux Directories: cd (Change Directory), pwd (Print Working Directory), mkdir (Make Directory)

Linux Directories: cd (Change Directory), pwd (Print Working Directory), mkdir (Make Directory)

Install WordPress on Raspberry Pi 4 with Docker (Ubuntu 22.04)

Install WordPress on Raspberry Pi 4 with Docker (Ubuntu 22.04)

Install Nextcloud on Raspberry Pi 4 with Docker (Ubuntu 22.04)

Install Nextcloud on Raspberry Pi 4 with Docker (Ubuntu 22.04)

Install Nginx Proxy Manager on Raspberry Pi 4 with Docker (Ubuntu 22.04)

Install Nginx Proxy Manager on Raspberry Pi 4 with Docker (Ubuntu 22.04)

Install Docker on Raspberry Pi 4 with Ubuntu 22.04

Install Docker on Raspberry Pi 4 with Ubuntu 22.04

Recent News

Install WordPress on Raspberry Pi 4 with Docker (Ubuntu 22.04)

Install WordPress on Raspberry Pi 4 with Docker (Ubuntu 22.04)

Install Nextcloud on Raspberry Pi 4 with Docker (Ubuntu 22.04)

Install Nextcloud on Raspberry Pi 4 with Docker (Ubuntu 22.04)

Install Nginx Proxy Manager on Raspberry Pi 4 with Docker (Ubuntu 22.04)

Install Nginx Proxy Manager on Raspberry Pi 4 with Docker (Ubuntu 22.04)

Install Docker on Raspberry Pi 4 with Ubuntu 22.04

Install Docker on Raspberry Pi 4 with Ubuntu 22.04

MikroTik: Check Your Wireless Password

MikroTik: Check Your Wireless Password

ADVERTISEMENT

DefenceDev Tutorials

defencedev Logo

Whether you’re just starting or looking to expand your skills, I hope you find useful information and engaging discussions here. Let me take you through my journey and the goals behind this space!

Follow Us

Browse by Category

  • Blog
  • Cloud
    • Private
  • Linux Tutorials
    • Bash Scripting Tutorials
    • Commands
    • Networking
  • Network Tutorials
    • FortiGate
    • MikroTik
  • Projects
    • AdGuard
    • Immich
    • Nextcloud
    • WordPress
  • Solutions
    • Docker
  • Video Tutorials
    • MikroTik Videos

Recent News

Install WordPress on Raspberry Pi 4 with Docker (Ubuntu 22.04)

Install WordPress on Raspberry Pi 4 with Docker (Ubuntu 22.04)

Install Nextcloud on Raspberry Pi 4 with Docker (Ubuntu 22.04)

Install Nextcloud on Raspberry Pi 4 with Docker (Ubuntu 22.04)

  • Site Map
  • Privacy Policy
  • Facebook Page
  • Disclaimer
  • Contact
  • About Me

© 2025 defencedev.com - All rights reserved.

No Result
View All Result
  • Home
  • Blog
  • Linux Tutorials
    • Bash Scripting Lessons
    • Commands
    • Networking
  • Solutions
    • Docker
  • Network Tutorials
    • FortiGate
    • MikroTik
  • Projects
    • AdGuard
    • Immich
    • Nextcloud
    • WordPress
  • Cloud
  • Video Tutorials
    • YouTube Channel
    • MikroTik Videos

© 2025 defencedev.com - All rights reserved.