Remote Access to Headquarter via OpenVPN Server
Remote Access to Headquarter via MikroTik OpenVPN Server or any other device is essential for enabling seamless communication between remote locations and the central network. When implemented with MikroTik’s OpenVPN, this access can be secured and optimized without routing internet traffic through the headquarters. In this guide, we’ll walk you through configuring a secure OpenVPN connection, ensuring that remote users or branch offices can access internal resources at the headquarters while maintaining an efficient and private network setup.
About OpenVPN
OpenVPN is a widely-used VPN protocol that enables secure internet access by encrypting traffic and masking the user’s IP address. By configuring OpenVPN on a MikroTik router, you can route traffic through a specific server location. It uses SSL/TLS encryption to protect data and offers flexible settings to fit various networking needs.
Moreover, OpenVPN works seamlessly across many platforms and adapts well to different network environments. This makes it perfect for creating secure remote access connections. It supports both site-to-site and client-to-server VPN setups, allowing businesses to connect branch offices to headquarters or remote workers to internal resources easily.
In addition, OpenVPN offers strong authentication methods, including certificates and pre-shared keys. It is also highly customizable, which lets administrators tailor the setup for specific needs. Thanks to its reliability, security, and compatibility, OpenVPN is a trusted choice for securing data and ensuring smooth connectivity.
Issue Description: Why Do I Need This Setup?
Benefits of This Approach:
- Reduced Internet Usage at the HQ Location
- By routing only internal traffic through the VPN and keeping internet traffic independent, the headquarters’ internet bandwidth is preserved for critical operations.
- Secure Access to HQ Resources
- Remote users or locations can securely access servers, databases, and other internal resources at the headquarters without exposing them to external threats.
- Improved Network Performance
- Avoiding unnecessary routing of internet traffic through the headquarters reduces latency and improves overall network speed and efficiency.
- Cost Efficiency
- With reduced internet bandwidth usage at the headquarters, companies can lower costs associated with upgrading bandwidth or managing excess traffic.
In many scenarios, remote locations need secure access to resources hosted at the headquarters without routing internet traffic through the central network. This setup is essential to maintain efficient communication while reducing unnecessary bandwidth usage at the headquarters.
By ensuring that only internal traffic is sent through the VPN, this configuration avoids bottlenecks and improves overall performance. Additionally, it strengthens security by allowing controlled access to internal systems without exposing them to direct internet traffic. Such an arrangement is ideal for businesses that want to enable seamless collaboration between remote and central locations while keeping internet usage independent and more efficient.
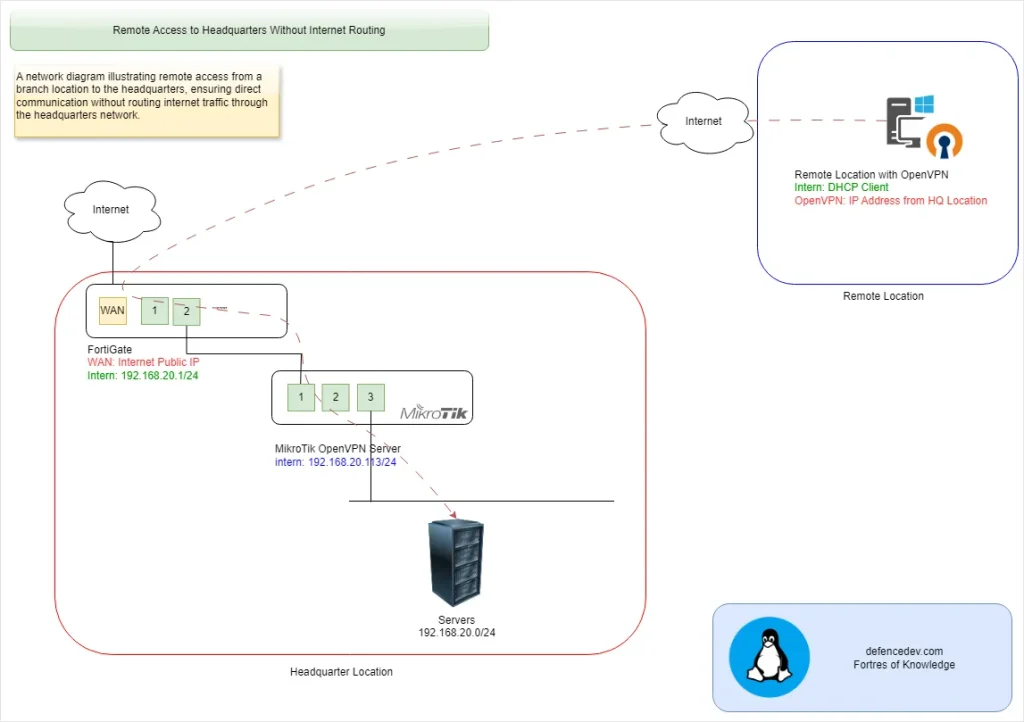
FortiGate Port Forwarding Configuration – Forward Ports to MikroTik Router OpenVPN Server
To enable port forwarding on a FortiGate firewall, you need to create and configure Virtual IP (VIP) rules and then assign them to the appropriate firewall policy. You can check the following article for more details.
Step 1: Create Port Forwarding (VIP – Virtual IP) Rules
Start by defining a Virtual IP (VIP) to map the external IP address and port to the internal server and port. This ensures that incoming traffic on the specified external port is redirected to the appropriate internal resource.
At this link you can check how to configure port forwarding on FortiGate device.
Step 2: Assign Port Forwarding to the Policy
After setting up the VIP, apply it to a firewall policy. This policy controls the flow of traffic and ensures that the port-forwarding rule is enforced, allowing external users to access the internal resource securely.
MikroTik OpenVPN Server Headquarter Configuration
Setting up OpenVPN on a MikroTik router at the headquarters involves several key steps, including generating certificates, configuring the server, and exporting the OpenVPN configuration for remote clients. Below is an overview of each stage.
Generate Certificates on MikroTik
Using MikroTik’s built-in certificate manager, you can create and sign these certificates to ensure secure communication between the server and remote clients. Properly setting up the CA is essential, as it validates the identities of the connecting devices.
The first step in securing your OpenVPN connection is generating the necessary certificates. These include the:
Step 1: Generate Certificate Authority (CA) Certificate
Follow the following steps to generate CA Certificate:

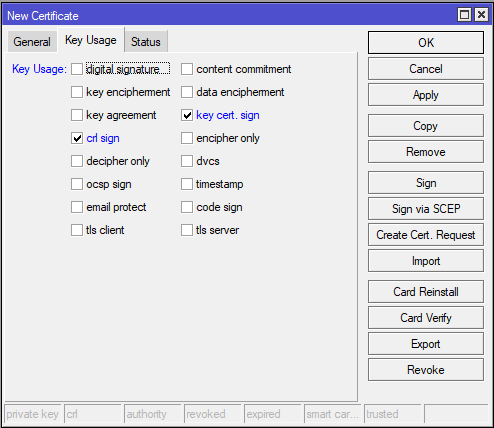
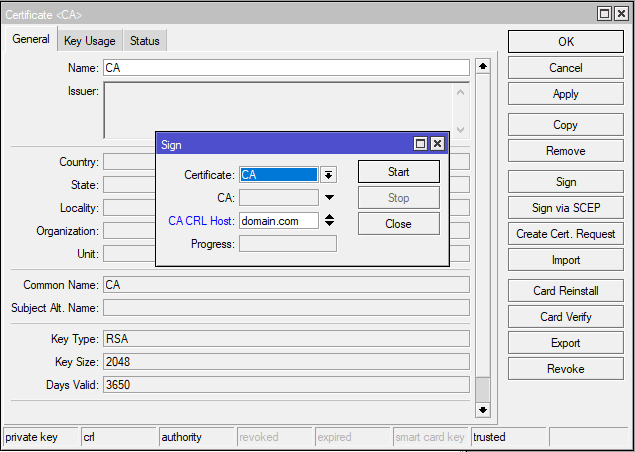
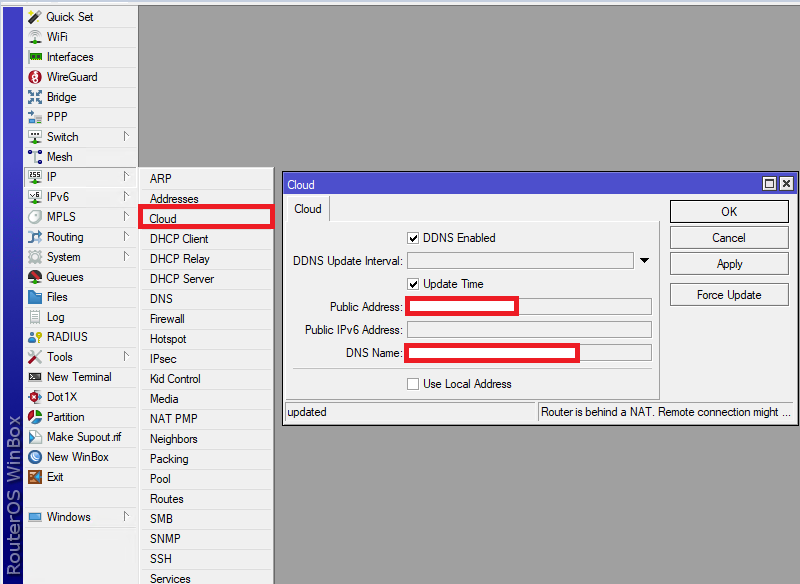
If you don’t have domain use MikroTik DNS Service:
Step2: Generate Server Certificate
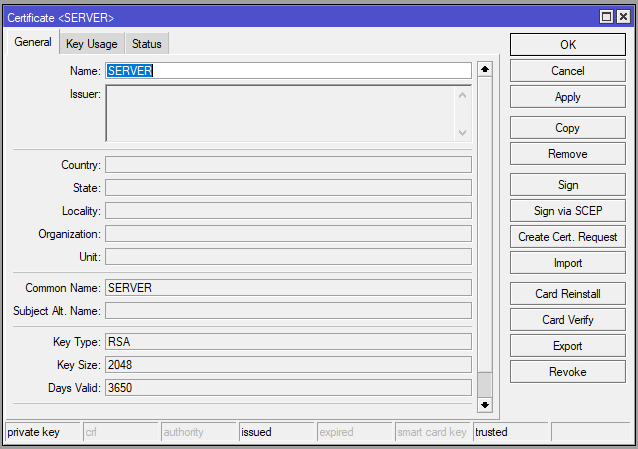
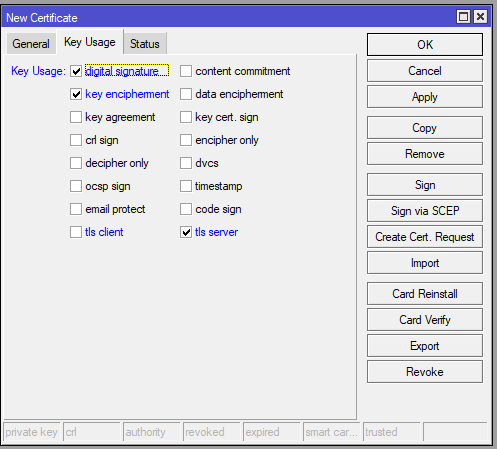
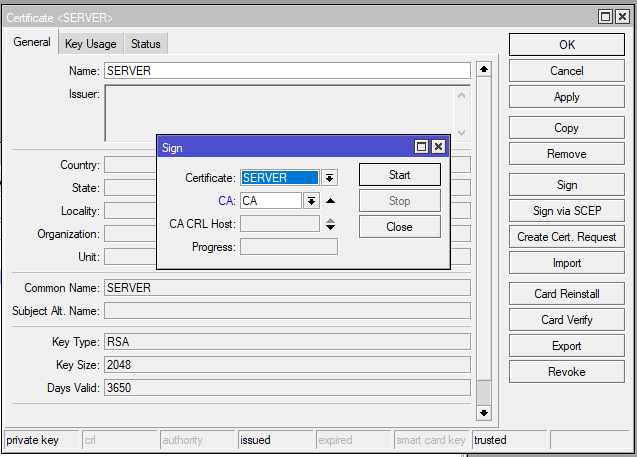
Generate Server Certificate for your OpenVPN Server:
Step 3: Genereate Client Certificate
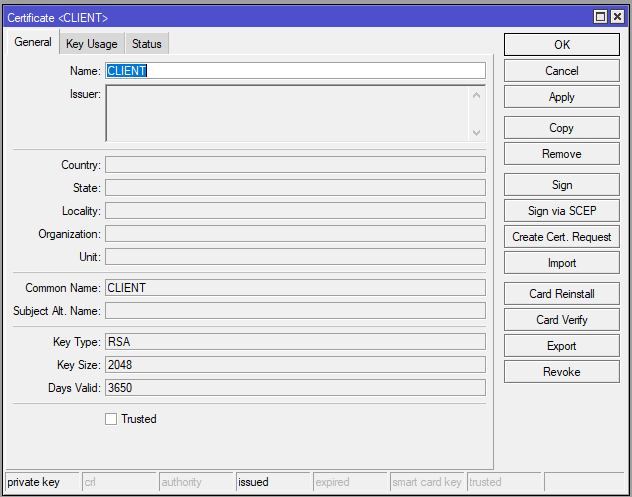
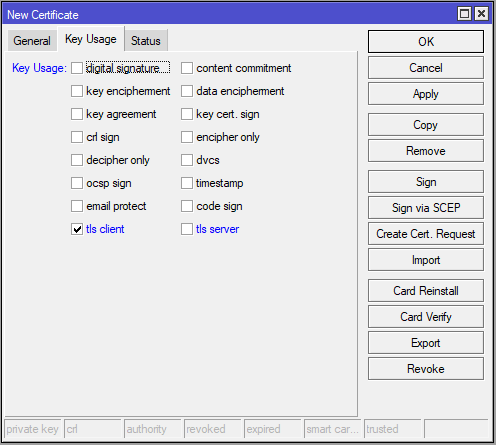
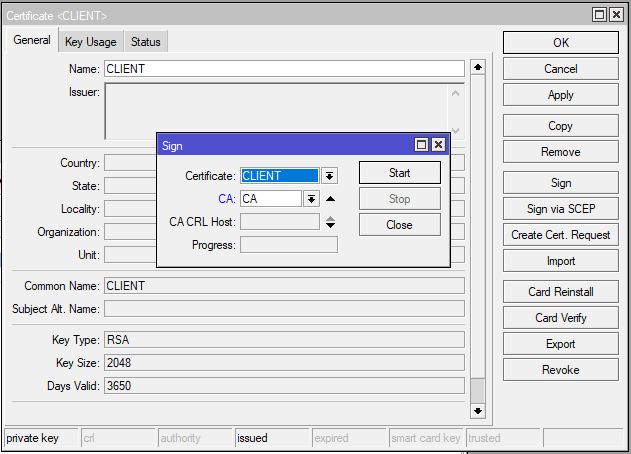
Configure MikroTik OpenVPN Server
Once the certificates are ready, configure the MikroTik router to act as the OpenVPN server. Start by enabling the OpenVPN service and specifying the server’s authentication methods, cipher settings, and port. Define the IP pool that will assign IP addresses to remote clients and create a profile to manage connection settings, such as routes and DNS configuration. This step ensures that remote clients can securely access the HQ network without routing their internet traffic through it.
Configuration on the MikroTik:
Config exported from device:
/interface bridge
add arp=proxy-arp name=bridge_intern
add name=bridge_mt
/ppp profile
set *0 bridge=bridge_intern local-address=192.168.20.113
/interface bridge port
add bridge=bridge_intern interface=ether1
add bridge=bridge_intern interface=ether2
add bridge=bridge_intern interface=ether3
/interface ovpn-server server
set certificate=SERVER enabled=yes port=1234 redirect-gateway=""
/ip address
add address=192.168.19.251/24 interface=bridge_mt network=192.168.19.0
/ip cloud
set ddns-enabled=yes
/ip dhcp-client
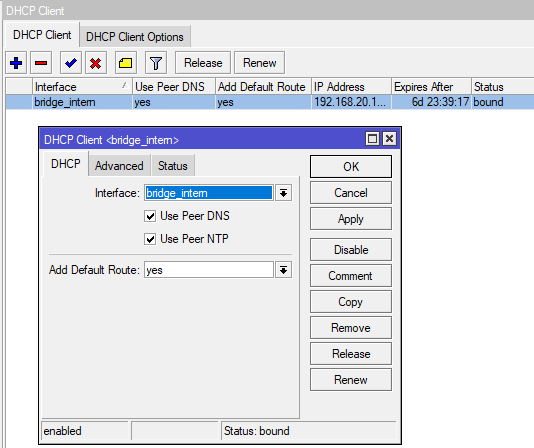
add interface=bridge_intern
/ppp secret
add name=defencedev remote-address=192.168.20.123
Step 1: Create a Brdige with Internal Ports
It’s important to create a bridge with internal ports to ensure that OpenVPN traffic is properly routed within your network. The bridge will act as a logical interface that connects multiple physical and virtual interfaces, ensuring seamless communication between the OpenVPN clients and internal network resources. Adding the internal ports (such as LAN interfaces) to the bridge allows remote users to access resources like file servers, printers, or other services available at the headquarters while maintaining network security.
Create Bridge Interface:
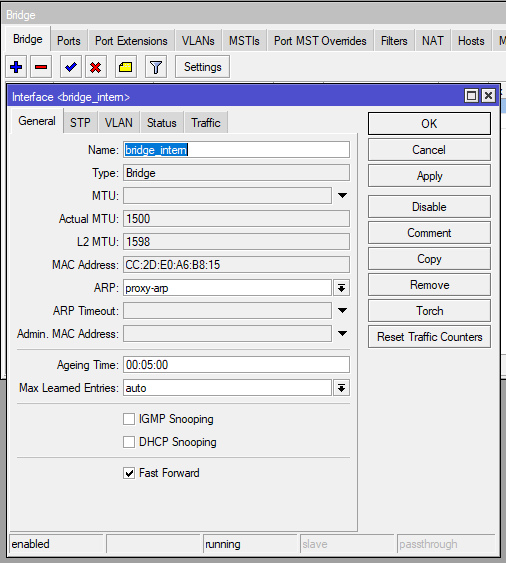
It is very important to select ARP: proxy-arp otherwise communication will not work properly. Please check the following link for more information.
Add ports to bridge interface:

Enable DHCP Client on bridge Interface:
Step 2: Configure OpenVPN Server
Enable OpenVPN Server:

I changed port from 1194 to 1234.
Check Profil settings:

I have just one user and didn’t use any Remote Address Pool for my users. It is defining under User configuration.
Create a user:
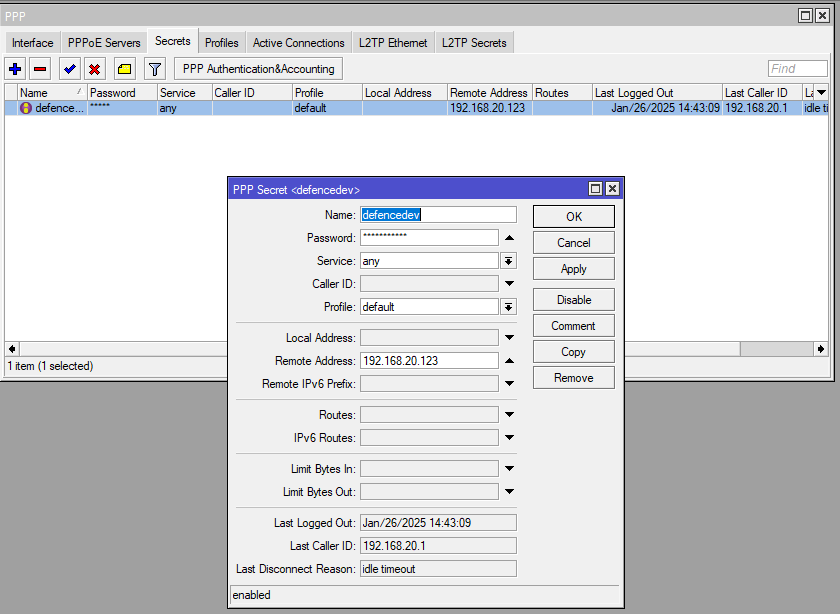
IP Address 192.168.20.113 is on a internal bridge interface.
User will have IP Address 192.168.20.123
Step 3: Export OpenVPN Configuration and Certificates
After setting up the MikroTik OpenVPN server, you need to export the required configuration and certificates. This includes the server’s certificates and a client-specific certificate to ensure secure authentication.
Start by generating the necessary certificates and configuration files in MikroTik’s certificate management. Export the client certificate, CA certificate, and client configuration file, which holds the server details, port information, and routing settings.
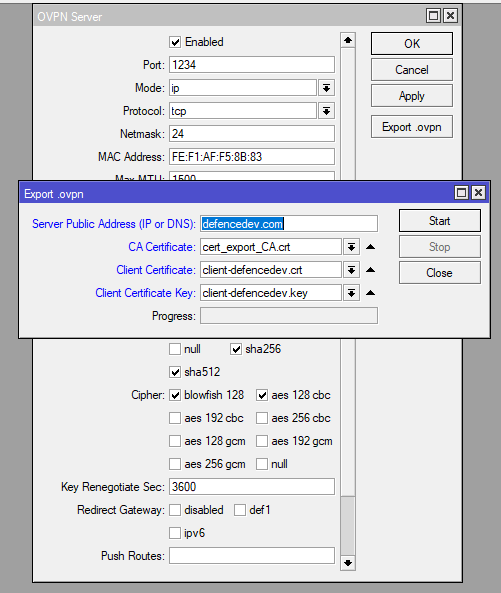

Once exported, package these files into a configuration bundle. This makes it easy to distribute them to remote clients, enabling a smooth OpenVPN client setup and seamless connection to the HQ network. Be sure to handle these export files securely, as they contain sensitive information needed to establish the VPN connection.
Configure OpenVPN Client on Windows PC
To connect a Windows PC to the MikroTik OpenVPN server, you’ll need to install the OpenVPN client software and configure it using the exported configuration file. Start by downloading and installing the OpenVPN GUI from the official OpenVPN website. After installation, import the configuration file that was exported from your MikroTik router. This file contains the necessary certificates, server details, and connection settings.
Once the configuration is imported, launch the OpenVPN GUI, select the server profile, and connect to the HQ network. The client will authenticate using the certificates, establish a secure connection, and provide access to the internal resources on the MikroTik network. Ensure that the OpenVPN service is running on both ends for the connection to be successful.


