
Port Forwarding (NAT) Configuration
Port forwarding is a vital technique for directing traffic from an external source to specific devices or services on your local network. This guide focuses on configuring port forwarding on a MikroTik router, ensuring seamless access to internal resources while maintaining network security.
Why Setting up Port Forwarding – Network Address Translation (NAT)
Security Note
While port forwarding is essential for these use cases, it can expose your internal network to potential threats. Always combine it with robust security measures, such as firewalls, IP filtering, or VPNs, to minimize risk.
Port forwarding is configured to allow external devices or users to access specific services or resources within a private network. Here’s why you might configure port forwarding:
- Enable Remote Access
- Port forwarding enables access to internal devices like servers, IP cameras, or remote desktops from outside the local network. For example, you can manage a web server or view a security camera feed while you’re away.
- Support Online Gaming and Applications
- Certain online games or applications require specific ports to be open for proper functionality. Port forwarding ensures that these ports are accessible, improving connectivity and performance.
- Host a Web or FTP Server
- If you’re running a server for websites or file sharing, port forwarding ensures that incoming requests on specific ports (e.g., HTTP on port 80, FTP on port 21) are routed to the correct internal server.
- Facilitate Peer-to-Peer Connections
- Applications like BitTorrent or VPNs often require port forwarding to improve connection reliability and speed by directly linking peers.
- Access IoT Devices
- Smart home devices such as thermostats, cameras, or alarms often rely on port forwarding to communicate with their cloud services or mobile apps for remote management.
- Testing and Development
- Developers use port forwarding to expose applications or services on their local machines to external testers or collaborators without deploying to a production environment.
Step-by-Step Setting up Port 443 Forwarding to Web Server (NAT) with WinBox
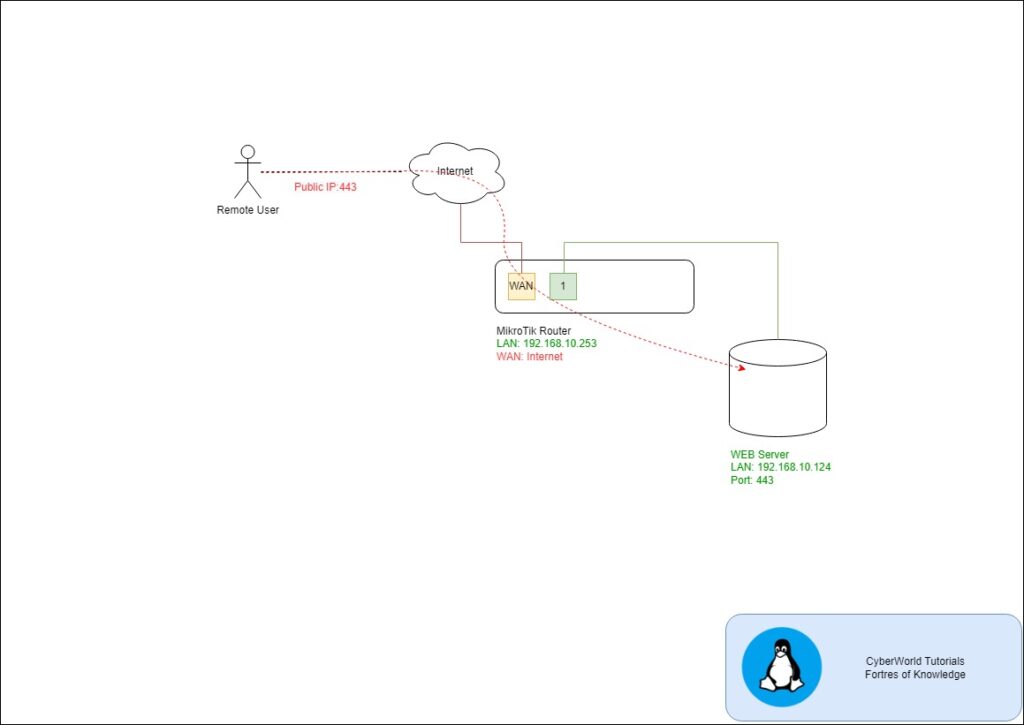
In this case, we will forward port 443 from the Internet to the local Web server on the IP Address 192.168.10.124.
Step 1: Access the MikroTik Interface
Log in to your MikroTik router using the WebFig interface or Winbox. Ensure you have administrative privileges.
Step 2: Define NAT Rules for Port 443
Navigate to IP > Firewall > NAT. Click the “+” button to add a new rule.
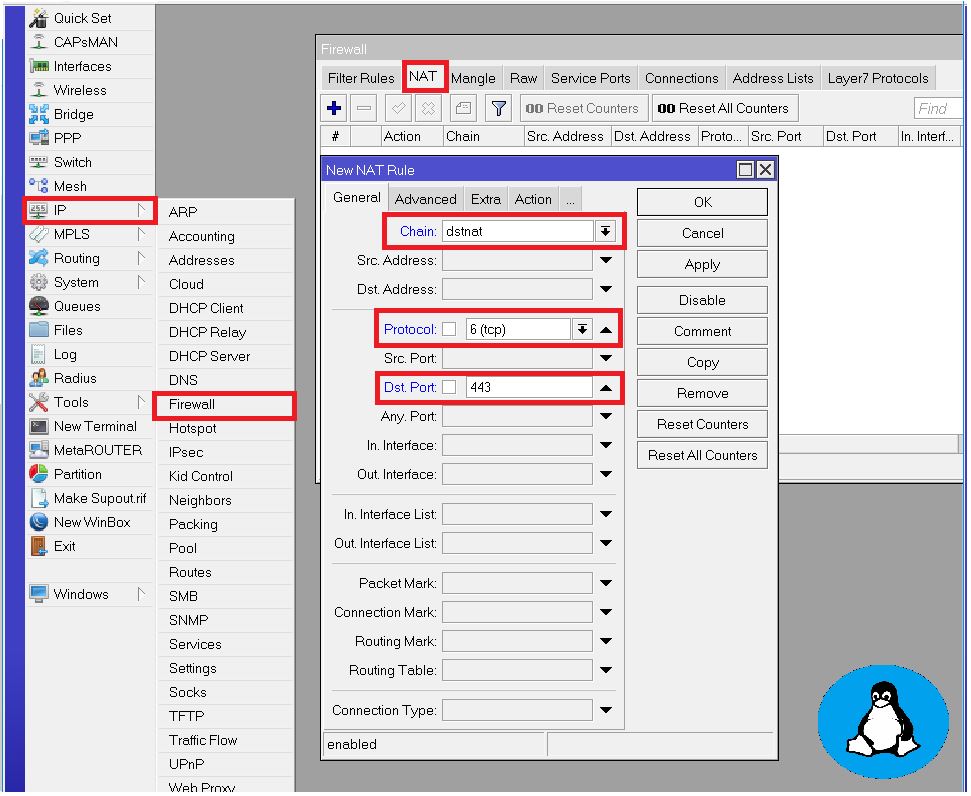
- Chain: Select
dstnat. - Protocol: Choose the relevant protocol (TCP, UDP).
- Dst. Port: Specify the port you want to forward (e.g., 80 for HTTP).
- In Interface: Select your WAN interface.
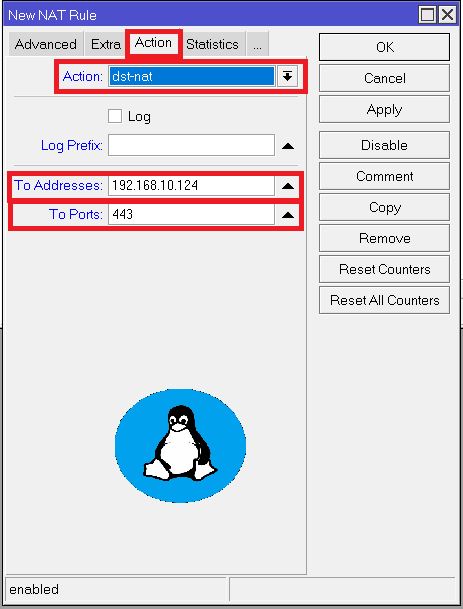
Step 3: Configure the Action for NAT Rule – Destination Port and Server IP
Go to the Action tab:
- Choose
dst-nat. - Enter the internal IP address and port of the device or service.
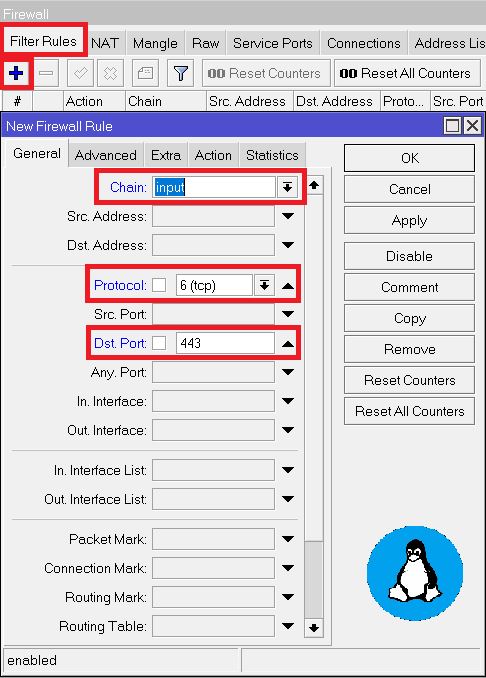
Step 4: Create a new Firewall Rule
Navigate to IP > Firewall > Filter Rules. Click the “+” button to add a new rule.
Go to the General tab:
- Choose
inputchain - Protocol:
6 (tcp) - Dst. Port:
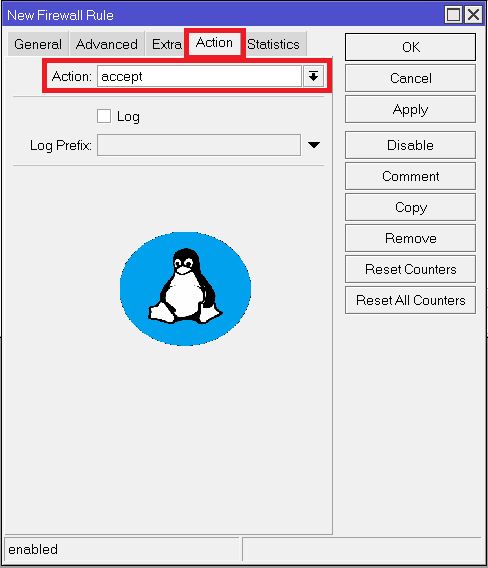
443 - In Sub Menu Action select
accept
Step 5: Apply and Test NAT Rule
Save the rule and test the setup using an external device. Tools like port checkers can confirm functionality. Ensure the firewall settings permit the forwarded traffic.
Other NAT example:


