
Nextcloud on Raspberry Pi 4
Looking for a secure and private cloud storage solution you can host at home? In this guide, you’ll learn how to Install Nextcloud on Raspberry Pi 4 with Docker (Ubuntu 22.04) — a powerful combination that gives you full control over your data.
By using Docker on Ubuntu 22.04, we simplify the deployment process and make it easy to manage updates and configurations. Whether you’re a beginner or an experienced developer, this step-by-step tutorial will help you Install Nextcloud on Raspberry Pi 4 with Docker (Ubuntu 22.04) quickly and efficiently.
Prerequisites
Before you begin, make sure you have the following:
- Raspberry Pi 4 (4GB RAM or more recommended)
- Ubuntu 22.04 (or a similar Linux distribution) installed
- Docker and Docker Compose installed
- Nginx Proxy Manager already set up (if you’re using a reverse proxy)
- Stable internet connection
- Basic command-line knowledge
Steps to Install Nextcloud on Raspberry Pi 4
1. Create Directories for Nextcloud
Run the following commands to create directories for application files and user data:
sudo mkdir -p /opt/nextcloud/app
sudo mkdir -p /opt/nextcloud/data

chown -R www-data:www-data /opt/nextcloud
chmod -R 750 /opt/nextcloud
These directories will be mounted into the container to ensure data persistence.
2. Create the docker-compose.yaml File
mkdir ~/nextcloud && cd ~/nextcloud
nano docker-compose.yaml
services:
nextcloud:
image: nextcloud
container_name: nextcloud
restart: always
ports:
- 8080:80
volumes:
- /opt/nextcloud/app:/var/www/html
- /opt/nextcloud/data:/var/www/html/data
networks:
- nginx-proxy-manager_npm_network
environment:
- PHP_UPLOAD_LIMIT=10G
networks:
nginx-proxy-manager_npm_network:
external: trueThis configuration uses an external Docker network shared with Nginx Proxy Manager and allows file uploads up to 10GB.
3. Start the Nextcloud Container
Run the following command to start the container:
docker compose up -dDocker will pull the necessary image and start the Nextcloud container. The app will be accessible at http://<your-RPi-IP>:8080.
With this command you can check if the NextCloud is Running:
docker ps4. Complete the Setup via Web Interface
Open your browser and go to http://<your-RPi-IP>:8080. Follow the on-screen instructions to create an admin account and configure the database (you can use SQLite for testing or connect to an external MariaDB instance).
In my case, I chose SQLite (which is not recommended for large environments) and simply entered a username and password for the Nextcloud application.
Troubleshooting Commands
docker network ls
Lists all Docker networks currently available on your system.
Useful for checking existing networks before creating a new one or troubleshooting connectivity between containers.
docker network create nginx_network
Creates a new user-defined Docker bridge network named nginx_network.
This is often used to allow multiple containers (e.g., Nginx, Nextcloud, database) to communicate with each other securely and efficiently.
sudo lsof -i :8080
Lists all processes currently using port 8080.
This is helpful to check if the port you plan to use (e.g., for Nginx or Nextcloud) is already occupied by another service.
Add Trust Domains in Your NextCloud Docker Configuration
nano /opt/nextcloud/app/config/config.php
'trusted_domains' =>
  array (
    0 => 'localhost',
    1 => '192.168.x.x',
    2 => 'data.defencedev.com',
  ),
Configuration in Nginx Proxy Manager
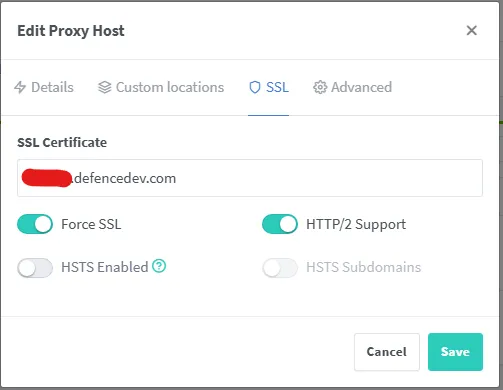
Under Host you can configure the following:
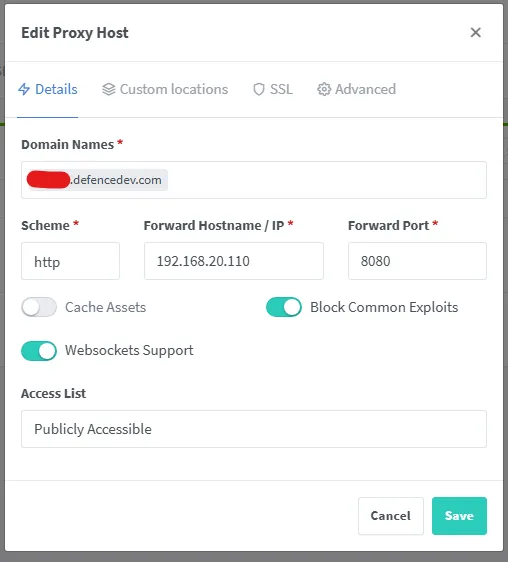
If you have issues with Sessions when visiting your NextCloud you can disable “Block Common Exploits”.
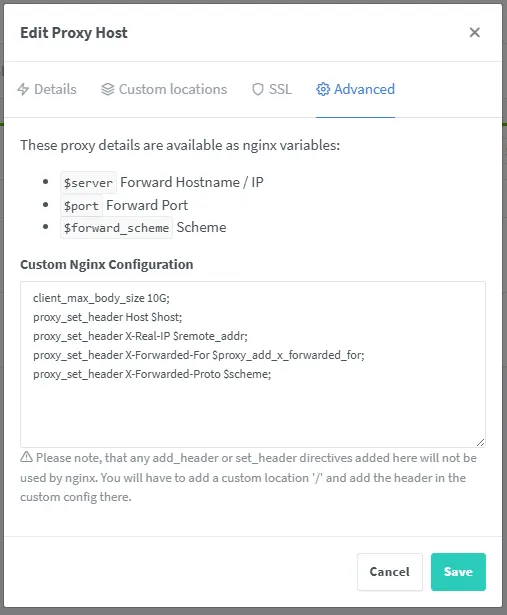
client_max_body_size 10G;
proxy_set_header Host $host;
proxy_set_header X-Real-IP $remote_addr;
proxy_set_header X-Forwarded-For $proxy_add_x_forwarded_for;
proxy_set_header X-Forwarded-Proto $scheme;
Conclusion
Installing Nextcloud on a Raspberry Pi 4 using Docker is a great way to set up your own private cloud. With Docker Compose, the setup is easy to manage and scale. The next step could be integrating and enabling HTTPS via Nginx Proxy Manager.


