WordPress on Raspberry Pi 4 with Docker
WordPress is one of the most popular CMS platforms today. Thanks to Docker, it’s easy to host it even on a Raspberry Pi 4. This guide shows how to deploy WordPress on a Raspberry Pi 4 running Ubuntu 22.04 using Docker and Docker Compose.
Prerequisites
Before you begin, make sure you have the following:
- Raspberry Pi 4 (4GB RAM or more recommended)
- Ubuntu 22.04 (or a similar Linux distribution) installed
- Docker and Docker Compose installed
- Nginx Proxy Manager already set up (if you’re using a reverse proxy)
- Stable internet connection
- Basic command-line knowledge
Steps to Install WordPress on Raspberry Pi 4
1. Create Directories
sudo mkdir -p /opt/wordpress-obd-scan/html
sudo mkdir -p /opt/wordpress-obd-scan/db
2. Create docker-compose.yml File
Create a file docker-compose.yml and paste the following content:
mkdir ~/wordpress && cd ~/wordpressversion: '3.9'
services:
wordpress:
image: wordpress:latest
container_name: wordpress-obd-scan
restart: always
environment:
WORDPRESS_DB_HOST: wordpress_db
WORDPRESS_DB_USER: wordpress_user
WORDPRESS_DB_PASSWORD: strong_password
WORDPRESS_DB_NAME: wordpress_db
volumes:
- /opt/wordpress-obd-scan/html:/var/www/html
networks:
- nginx-proxy-manager_npm_network
expose:
  - "80"
wordpress_db:
image: mariadb:10.5
container_name: wordpress-obd-scan-db
restart: always
environment:
MYSQL_DATABASE: wordpress_db
MYSQL_USER: wordpress_user
MYSQL_PASSWORD: strong_password
MYSQL_ROOT_PASSWORD: root_password
volumes:
- /opt/wordpress-obd-scan/db:/var/lib/mysql
networks:
- nginx-proxy-manager_npm_network
networks:
nginx-proxy-manager_npm_network:
external: true
Replace
strong_passwordandroot_passwordwith secure values.Note About Special Characters in YAML
When writing passwords or other values in your
docker-compose.ymlfile, be careful with the characters you use—especially if you’re not using quotes.Characters to Avoid Without Quotes:
These characters may cause parsing issues or unexpected behavior because they have special meanings in YAML:
!→ used as a tag indicator:→ may be interpreted as a key-value separator#→ treated as a comment{,},[,],,,&,*,%,@→ may be interpreted as YAML syntax elementsSafe Characters (without quotes):
If you want to use unquoted passwords (not recommended for strong passwords), stick to the following characters:
- Letters:
a–z,A–Z- Numbers:
0–9- Safe symbols:
.,-,_Tip: For stronger passwords with special characters, always wrap the value in double quotes (
").Example:
MYSQL_ROOT_PASSWORD: “!SecurePass2025#”
Note About Access to the WordPress
Accessing WordPress via Port (Without Reverse Proxy)
If you don’t want to use a reverse proxy like Nginx Proxy Manager and prefer to access WordPress directly via a custom port (e.g., http://raspberrypi.local:8090), you can update the YAML configuration as follows:
Replace:
expose:
- "80"With:
ports:
  - "8090:80"
Explanation:
exposeonly makes the port available internally to other Docker containers on the same network.portspublishes the container’s port to the host machine. In this case, port80inside the container becomes accessible from outside on port8090.
???? So, if you open your browser and go to
http://<raspberry-pi-ip>:8090, you’ll reach the WordPress site directly — no need for domain names or reverse proxy setup.
3. Start the Containers
With this command Docker will download the necessary images and start both WordPress and MariaDB containers:
sudo docker-compose up -d4. Set Up a Reverse Proxy (Optional)
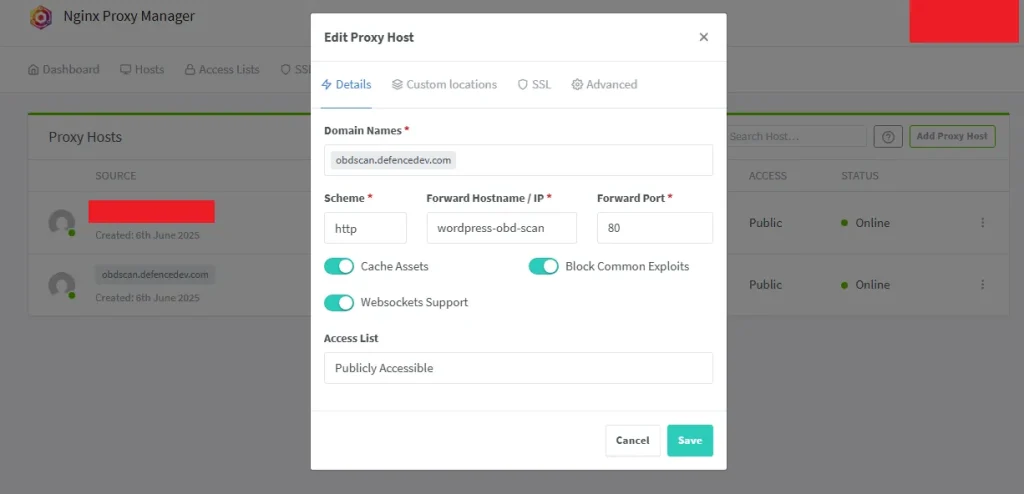
If you use Nginx Proxy Manager, create a new proxy host:
- Forward hostname/IP:
wordpress - Forward port:
80 - Point your domain to the Raspberry Pi IP
- Enable SSL via Let’s Encrypt (optional)
5. Define Domain in WordPress Configuration
Accessing the MariaDB Database Inside the WordPress Container
If you need to connect to the MariaDB database running in your wordpress-obd-scan-db container (e.g., to check or update WordPress site URLs), follow these steps:
Step 1: Open a Shell in the Database Container
Run this command from your host terminal:
docker exec -it wordpress-obd-scan-db shThis gives you shell access inside the MariaDB container.
Step 2: Access the MariaDB
Inside the container, launch the MySQL client:
mysql -u wordpress -pWhen prompted for a password, enter the one you defined under MYSQL_PASSWORD in your Docker Compose file.
(In your case, this was set to a value
root_password— make sure to use your actual password.)Step 3: Select the WordPress Database and Check URL Values
Once inside the MySQL client, select the database:
USE wordpress;Then, check the current site URL and home URL values:
SELECT option_name, option_value FROM wp_options WHERE option_name IN ('siteurl', 'home');Step 4 (Optional): Update the URL to Use HTTP or a Different Domain
If necessary, you can update the site URLs with:
UPDATE wp_options SET option_value = 'http://yourdomain.com' WHERE option_name IN ('siteurl', 'home');???? This is useful if WordPress is redirecting to the wrong domain or protocol.
Step 5: Exit the MySQL Client and Container
From the MySQL prompt:
exitFrom the container shell:
exitOptional: Check If WordPress Domain Is Defined in wp-config.php
Sometimes WordPress domain settings (WP_HOME and WP_SITEURL) are defined directly in the configuration file. If these constants are set, they will override values in the database.
To check this:
Open the wp-config.php File
nano /opt/wordpress-obd-scan/html/wp-config.phpLook for These Lines:
define('WP_HOME', 'http://yourdomain.com');
define('WP_SITEURL', 'http://yourdomain.com');
What to Do:
- If these lines are commented out with
//, then WordPress uses the values from the database.
Configuration in Nginx Proxy Manager
Under Host you can configure the following:
Conclusion
You now have a fully working WordPress installation on your Raspberry Pi 4 using Docker. It’s ideal for testing, small projects, or learning web hosting from home.


