• Contact
  • About Me
  • Privacy Policy
DefenceDev
  • Home
  • Blog
  • Linux Tutorials
    • Bash Scripting Lessons
    • Commands
    • Networking
  • Solutions
    • Docker
  • Network Tutorials
    • FortiGate
    • MikroTik
  • Projects
    • AdGuard
    • Immich
    • Nextcloud
    • WordPress
  • Cloud
  • Video Tutorials
    • YouTube Channel
    • MikroTik Videos
No Result
View All Result
DefenceDev
No Result
View All Result
ADVERTISEMENT
Home Solutions

Fix “blk_update_request: critical target error” on Ubuntu Server with SSD (dev sdb, DISCARD Operation)

neo by neo
May 27, 2025
in Solutions
0
Fix "blk_update_request: critical target error" on Ubuntu Server (dev sdb, DISCARD Operation)

Fix "blk_update_request: critical target error" on Ubuntu Server (dev sdb, DISCARD Operation)

0
SHARES
183
VIEWS
Share on FacebookShare on Twitter
ADVERTISEMENT

Introduction

In this guide, you’ll learn how to fix the “blk_update_request: critical target error” on Ubuntu Server with SSD when it involves the dev sdb device and a failing DISCARD operation (TRIM command).

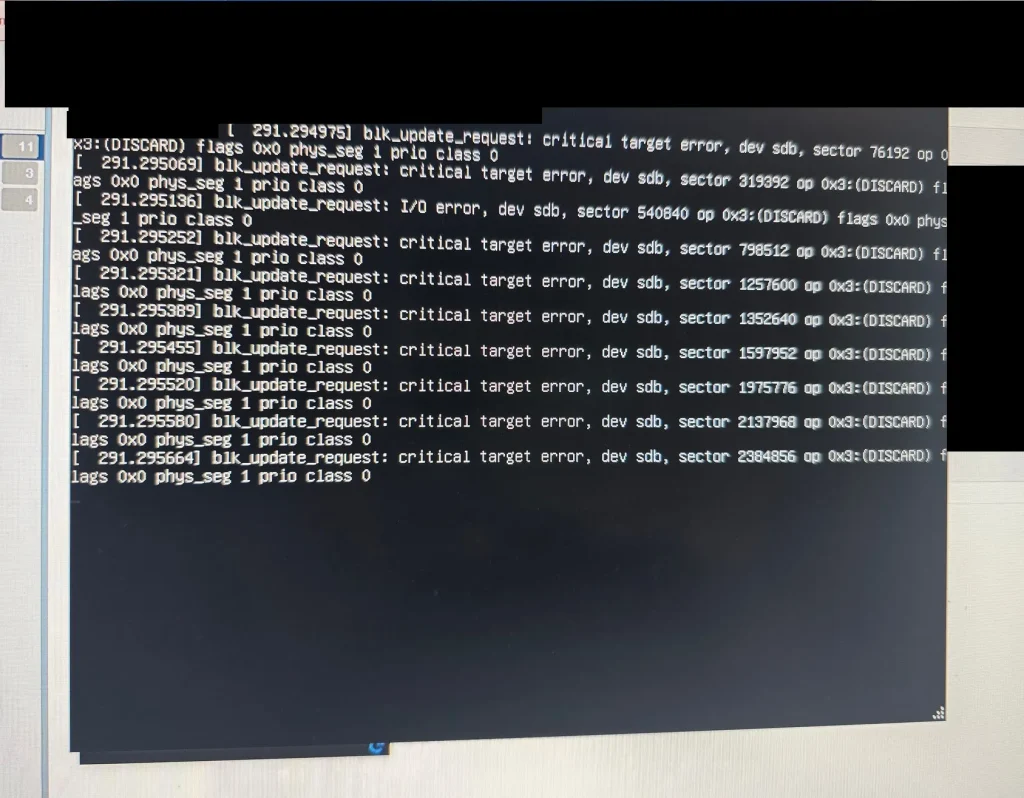
If you’re running an Ubuntu Server on Esxi host and encountering the following error in your system logs:

blk_update_request: critical target error, dev sdb, sector 197556 op 0x3: (DISCARD)

— you’re not alone :)- This message typically points to an I/O operation failure on a storage device (/dev/sdb in this case), and it’s often associated with the DISCARD operation, which is related to TRIM functionality on SSDs.

In this article, we’ll explore what this error means, why it occurs, and how you can fix it on both SSD and HDD storage devices.

"blk_update_request: critical target error" on Ubuntu Server (dev sdb, DISCARD Operation)
Fix “blk_update_request: critical target error” on Ubuntu Server (dev sdb, DISCARD Operation)

Understanding the “blk_update_request: critical target error” Error


Let’s break down the error:

blk_update_request: critical target error

This means the kernel attempted to perform a block-level operation and the request failed critically.

dev sdb, sector 197556

The error occurred on device /dev/sdb, at the specified sector.

op 0x3: (DISCARD)

The operation attempted was a DISCARD, also known as a TRIM command, which helps SSDs manage unused space by clearing blocks.

So, what does it mean?

The kernel tried to issue a TRIM operation to /dev/sdb, but the operation failed — possibly due to hardware incompatibility, a faulty disk, or misconfigured mount options.

Prerequisits

Before you begin troubleshooting the blk_update_request: critical target error, make sure you have the following in place:

  • ✅ A recent backup of any important data or configuration files associated with the affected disk (/dev/sdb). It’s essential to prevent data loss during disk operations or configuration changes. You can use rsync or tar for a quick backup. Here’s an example using rsync:
sudo rsync -avh /mnt/data/ /mnt/backup/
  • ✅ Sudo (root) privileges on the Ubuntu server to execute system-level commands and edit configuration files such as /etc/fstab. To verify if you have sudo access, run:
sudo -v

If the command doesn’t return any error, you have the necessary privileges.

ADVERTISEMENT

Steps to Solve the Error

Step 1: Identify the Disk Type (SSD or HDD)

Different devices handle the DISCARD operation differently. To check whether /dev/sdb is a spinning hard drive (HDD) or a solid-state drive (SSD), run:

cat /sys/block/sdb/queue/rotational
  • Output 0 → SSD
  • Output 1 → HDD

Note: The TRIM (DISCARD) operation is only relevant for SSDs. Using it on HDDs may cause errors.

Step 2: Check the Disk Health (SMART Status)

Regardless of the disk type, it’s important to rule out hardware failure:

sudo apt install smartmontools
sudo smartctl -a /dev/sdb

Look for key indicators:

ADVERTISEMENT
  • Reallocated_Sector_Ct
  • Current_Pending_Sector
  • Power_On_Hours
  • SMART overall-health self-assessment test result

If SMART reports any FAILING_NOW status or a high number of reallocated/pending sectors, the disk might be failing.

Step 3: Adjust Mount Options (Disable DISCARD)

If your disk is not an SSD, or your SSD doesn’t support online TRIM properly, you can disable the discard option in /etc/fstab.

1. Open the fstab file:

sudo nano /etc/fstab

2. Find the line for /dev/sdb (or its mount point, like /mnt/data), and remove discard from the options.

ADVERTISEMENT

Before:

/dev/sdb1 /mnt/data ext4 defaults,discard 0 2

After: -> Remove discard option

/dev/sdb1 /mnt/data ext4 defaults 0 2

3. Save the file and reboot your system:

sudo reboot

Additional Checks and Tips

  • Check dmesg logs for more disk-related messages:
dmesg | grep sdb
  • Ensure proper cabling if you’re running on physical hardware. A loose or damaged SATA/power cable can cause intermittent I/O errors.
  • If using RAID or LVM, check the health of the array or volume group.

Conclusion

The blk_update_request: critical target error related to the DISCARD operation is a common issue, especially on systems that are misconfigured to use TRIM on unsupported hardware. With a few diagnostic steps — checking your disk type, disabling the discard option, and switching to scheduled TRIM — you can resolve the issue and keep your Ubuntu server running smoothly.

If your disk shows signs of physical failure during the SMART check, consider replacing it to avoid future data loss.

Articles With Similar Topics

Discover more articles with similar topics:

  • NextCloud: Change – Replace Hard Drive for the Data
  • How to Extend Partition on Ubuntu with fdisk
  • Solutions: Add and Mount New Hard Drive (HDD or SSD) to Ubuntu

About The Author

neo

See author's posts

Tags: linux
ADVERTISEMENT
Previous Post

MikroTik VLAN Configuration

Next Post

Remote Desktop Access to Ubuntu 24.04 from Windows

neo

neo

Next Post
Remote Desktop Access to Ubuntu 24.04 from Windows

Remote Desktop Access to Ubuntu 24.04 from Windows

Follow Us

  • Trending
  • Comments
  • Latest
MikroTik: Export Configuration in Text File

MikroTik: Export Configuration in Text File

Fortinet FortiGate: Static Route Configuration via GUI and CLI

Fortinet FortiGate: Static Route Configuration via GUI and CLI

Immich: Installation on Ubuntu 22.04

Immich: Installation on Ubuntu 22.04

Fortinet FortiGate Upgrade Path Tool

Fortinet FortiGate Upgrade Path Tool

NextCloud: Port Forwarding - Essential Ports for Smooth Functionality

NextCloud: Port Forwarding – Essential Ports for Smooth Functionality and Remote Access

Organizing and Managing Photos with Immich: Features I Use

Organizing and Managing Photos with Immich: Features I Use

Install Ubuntu 22.04 on Oracle VM Virtual Box

Install Ubuntu 22.04 on Oracle VM Virtual Box

Linux Directories: cd (Change Directory), pwd (Print Working Directory), mkdir (Make Directory)

Linux Directories: cd (Change Directory), pwd (Print Working Directory), mkdir (Make Directory)

Install WordPress on Raspberry Pi 4 with Docker (Ubuntu 22.04)

Install WordPress on Raspberry Pi 4 with Docker (Ubuntu 22.04)

Install Nextcloud on Raspberry Pi 4 with Docker (Ubuntu 22.04)

Install Nextcloud on Raspberry Pi 4 with Docker (Ubuntu 22.04)

Install Nginx Proxy Manager on Raspberry Pi 4 with Docker (Ubuntu 22.04)

Install Nginx Proxy Manager on Raspberry Pi 4 with Docker (Ubuntu 22.04)

Install Docker on Raspberry Pi 4 with Ubuntu 22.04

Install Docker on Raspberry Pi 4 with Ubuntu 22.04

Recent News

Install WordPress on Raspberry Pi 4 with Docker (Ubuntu 22.04)

Install WordPress on Raspberry Pi 4 with Docker (Ubuntu 22.04)

Install Nextcloud on Raspberry Pi 4 with Docker (Ubuntu 22.04)

Install Nextcloud on Raspberry Pi 4 with Docker (Ubuntu 22.04)

Install Nginx Proxy Manager on Raspberry Pi 4 with Docker (Ubuntu 22.04)

Install Nginx Proxy Manager on Raspberry Pi 4 with Docker (Ubuntu 22.04)

Install Docker on Raspberry Pi 4 with Ubuntu 22.04

Install Docker on Raspberry Pi 4 with Ubuntu 22.04

MikroTik: Check Your Wireless Password

MikroTik: Check Your Wireless Password

ADVERTISEMENT

DefenceDev Tutorials

defencedev Logo

Whether you’re just starting or looking to expand your skills, I hope you find useful information and engaging discussions here. Let me take you through my journey and the goals behind this space!

Follow Us

Browse by Category

  • Blog
  • Cloud
    • Private
  • Linux Tutorials
    • Bash Scripting Tutorials
    • Commands
    • Networking
  • Network Tutorials
    • FortiGate
    • MikroTik
  • Projects
    • AdGuard
    • Immich
    • Nextcloud
    • WordPress
  • Solutions
    • Docker
  • Video Tutorials
    • MikroTik Videos

Recent News

Install WordPress on Raspberry Pi 4 with Docker (Ubuntu 22.04)

Install WordPress on Raspberry Pi 4 with Docker (Ubuntu 22.04)

Install Nextcloud on Raspberry Pi 4 with Docker (Ubuntu 22.04)

Install Nextcloud on Raspberry Pi 4 with Docker (Ubuntu 22.04)

  • Site Map
  • Privacy Policy
  • Facebook Page
  • Disclaimer
  • Contact
  • About Me

© 2025 defencedev.com - All rights reserved.

No Result
View All Result
  • Home
  • Blog
  • Linux Tutorials
    • Bash Scripting Lessons
    • Commands
    • Networking
  • Solutions
    • Docker
  • Network Tutorials
    • FortiGate
    • MikroTik
  • Projects
    • AdGuard
    • Immich
    • Nextcloud
    • WordPress
  • Cloud
  • Video Tutorials
    • YouTube Channel
    • MikroTik Videos

© 2025 defencedev.com - All rights reserved.