Remote Desktop Access to Ubuntu
Remote Desktop Access to Ubuntu 24.04 from Windows is a simple way to control your Linux system remotely. It lets you use Ubuntu through a familiar interface — straight from your Windows PC. This setup is useful for many reasons. For example, you might need to manage a home server, run Linux apps remotely, or access files on your Ubuntu machine while traveling. In this guide, you’ll learn how to install xRDP on Ubuntu 24.04. We’ll also set up XFCE, a fast and lightweight desktop environment that works well with RDP.
Step by step, we’ll go through the entire process. No complex tools. No confusing settings. Just a clean and efficient remote desktop experience.
Prerequisites
Before you begin setting up xRDP with XFCE on your Ubuntu 24.04 system, make sure you have the following:
- A running Ubuntu 24.04 system: This guide assumes you are using Ubuntu 24.04 Desktop or Server edition. Make sure your system is up-to-date.
- Root or Sudo privileges: You will need administrative access to your system to install packages and configure services. Ensure you have sudo privileges.
- Network access: Ensure your Ubuntu machine is accessible from the network. You’ll need to be able to connect to it from a Windows machine or any device with an RDP client.
- RDP client: On your remote machine, make sure you have an RDP client installed (e.g., Windows’ built-in Remote Desktop Connection, or any third-party RDP client like Remmina for Linux, or Microsoft Remote Desktop for macOS).
- Basic terminal skills: This guide requires basic knowledge of using the terminal to install packages, configure files, and run commands.
Option 1: Remote Desktop Access GUI Configuration
If you prefer using the graphical interface instead of the terminal, Ubuntu 24.04 also offers a built-in Remote Login feature. Here’s how to enable it:
Step-by-Step Instructions:
Step 1: Open Settings
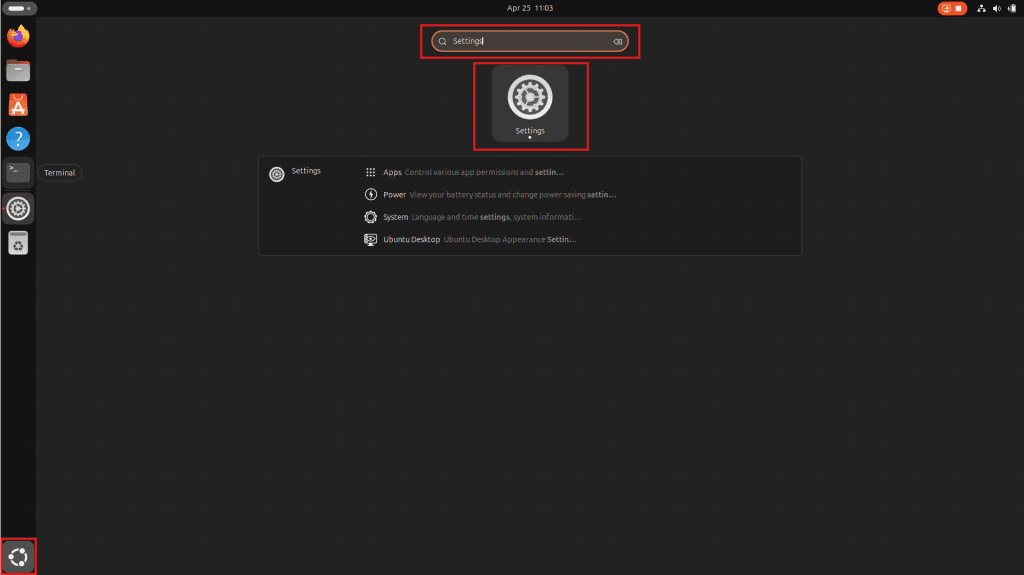
Click on the system menu in the top right corner of your screen and select Settings or just Type Settings in Search box.
Step 2: Navigate to System > Remote Login
In the left sidebar, scroll down and click on System.
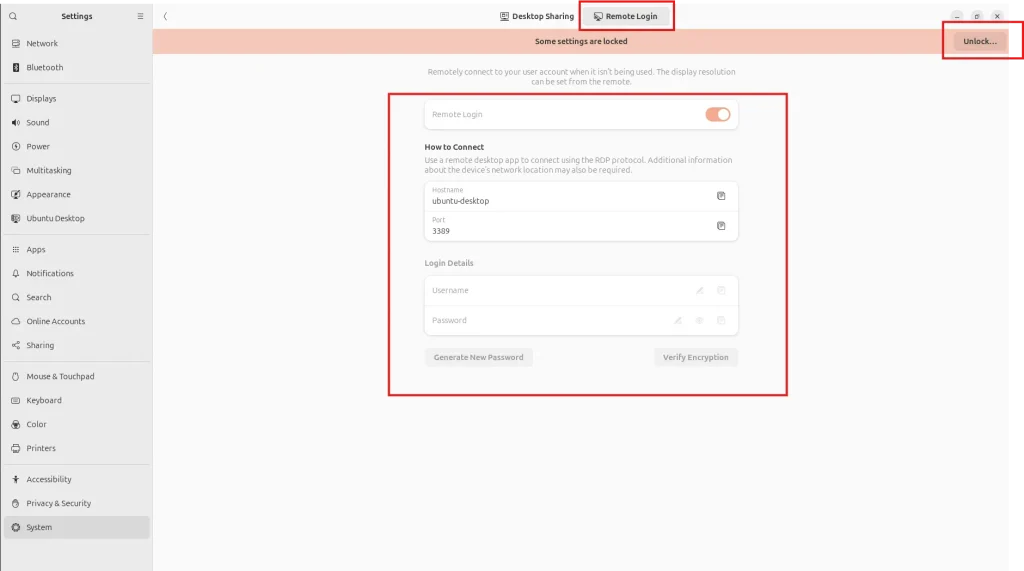
Then, choose Remote Login from the right panel.
Step 3: Enable Remote Login and Enter Login Details
Toggle the switch to ON to enable remote desktop access.Under Login Details specify your username and password. In my case I am using Desktop Sharing and I put this information there.
Note the IP Address
Take note of your Ubuntu device’s IP address. You’ll need it to connect from your Windows machine. You can check in terminal with the command ip address
Step 4: Connect from the Windows to the Ubuntu Server
Open Remote Desktop Connection on Windows and enter the IP Adress of your Ubuntu Server. In my case I am using Oracle VirtualBox Port Forwarding and connection profile looks like this:

Option 2: Remote Desktop Access Installation Script – Not recommended
Explanation of the Script
- Step 1: The script starts by updating the package lists to ensure you’re getting the latest versions of the software.
- Step 2: It installs the Xubuntu desktop environment (XFCE), which is lightweight and perfect for remote desktop use.
- Step 3: The
xrdppackage is installed to allow RDP access to the Ubuntu system. - Step 4: The script configures
lightdmas the default display manager, which is recommended for use with XFCE and xRDP. - Step 5: It adds the
xrdpuser to thessl-certgroup, which is required to access SSL certificates. - Step 6: It creates the
.xsessionfile, which instructs xRDP to start the XFCE session when logging in via RDP. - Step 7: The script cleans up any old session data to ensure a smooth connection.
- Step 8: The xRDP service is restarted to apply the changes made by the script.
- Step 9: It ensures that xRDP will start automatically when the system reboots.
- Step 10: If your firewall is enabled, it opens port 3389, which is required for RDP traffic.
- Step 11: The script finishes by notifying you that the setup is complete and you can now access the system via RDP.
#!/bin/bash

# This script automates the installation and setup of xRDP with XFCE on Ubuntu.

# 1. Update the package lists to ensure we get the latest version of all packages
echo "Updating package lists..."
sudo apt update -y

# 2. [OPTIONAL] Install Xubuntu desktop environment (XFCE) for a lightweight and fast desktop experience
#echo "Installing Xubuntu desktop..."
#sudo apt install xubuntu-desktop -y

# 3. Install xRDP for remote desktop access
echo "Installing xRDP..."
sudo apt install xrdp -y

# 4. Set lightdm as the display manager (this works best with XFCE and xRDP)
echo "Setting lightdm as the default display manager..."
sudo dpkg-reconfigure lightdm

# 5. Add the xrdp user to the ssl-cert group to allow access to the SSL certificates
echo "Adding xrdp user to ssl-cert group..."
sudo adduser xrdp ssl-cert

# 6. Create the .xsession file to start XFCE for xRDP sessions
# This file tells xRDP to start XFCE when a user connects via RDP
echo "Creating .xsession file to start XFCE..."
echo "startxfce4" > ~/.xsession
chmod +x ~/.xsession  # Make sure the file is executable

# 7. Clean up old xRDP sessions (if any) to avoid conflicts during the new connection
echo "Cleaning up old sessions..."
rm -rf ~/.cache/sessions/*

# 8. Restart xRDP service to apply the new configuration
echo "Restarting xRDP service..."
sudo systemctl restart xrdp

# 9. Enable xRDP to start automatically on boot
echo "Enabling xRDP service to start on boot..."
sudo systemctl enable xrdp

# 10. Open port 3389 on the firewall (if UFW is enabled) to allow RDP traffic
echo "Opening port 3389 for RDP access..."
sudo ufw allow 3389/tcp

# 11. Setup complete!
echo "Setup complete! You can now connect to your Ubuntu desktop via RDP using your username and password."
How to Use the Script
Copy the script and save it to a file, e.g., install-xrdp.sh.
nano install-xrdp.shMake the script executable:
chmod +x install-xrdp.shRun the script:
./install-xrdp.sh

